> ## Documentation Index
> Fetch the complete documentation index at: https://docs.ryft.io/llms.txt
> Use this file to discover all available pages before exploring further.
# Configuring Okta SSO
> Step-by-step guide to set up Okta single sign-on for Ryft. Create an OIDC app, configure redirect URIs, and share credentials with Ryft.
To connect Okta as an identity provider in Ryft, create an OIDC application.
### Creating an application
1. Log in to your Okta Admin Console.
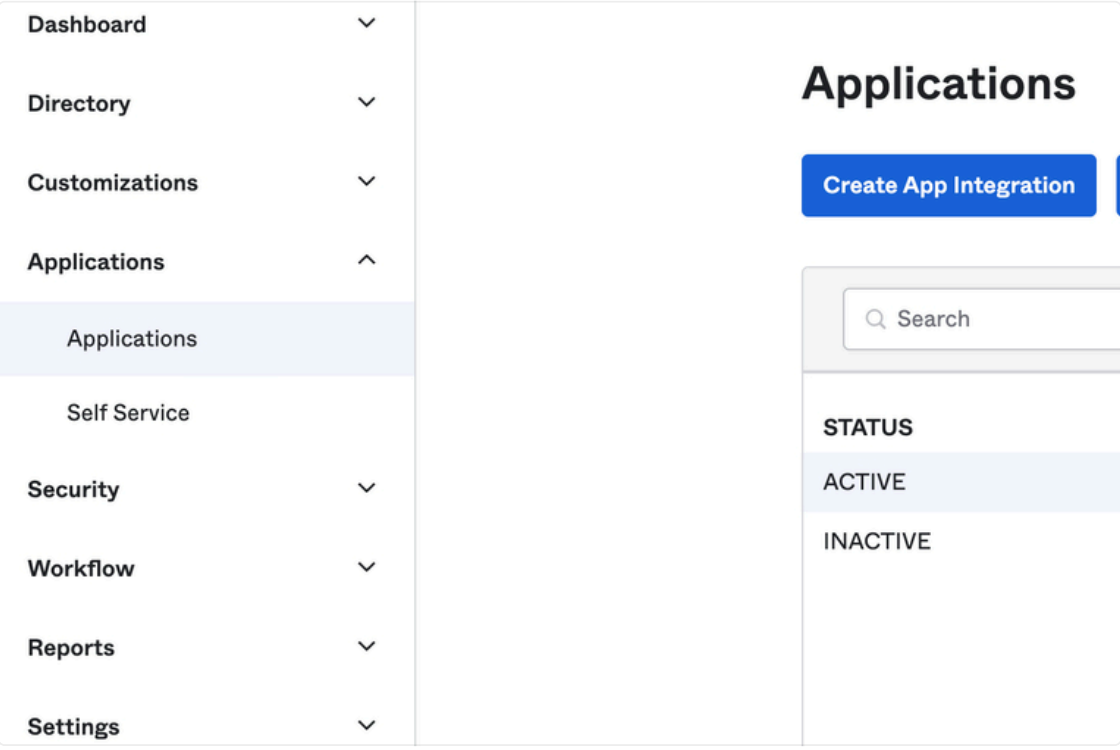
2. Navigate to **Applications** > **Applications**, and click on **Create App Integration**.
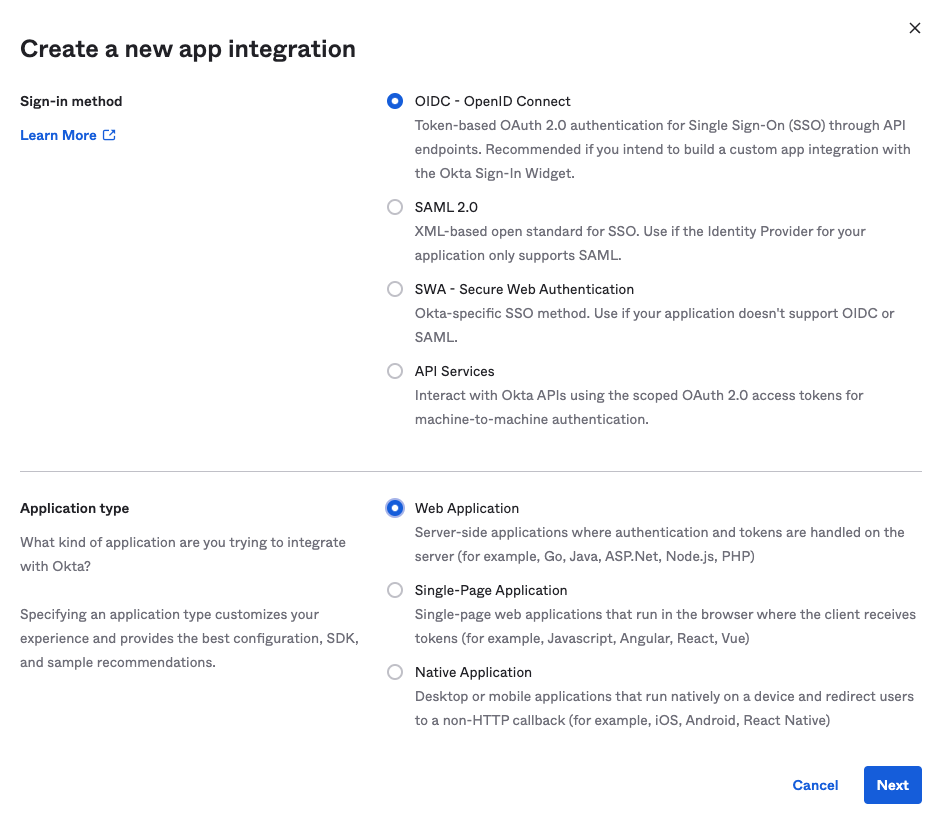
 3. Select **OIDC - OpenID Connect** as the Sign-in method.
4. Select **Web Application** as the Application type.
3. Select **OIDC - OpenID Connect** as the Sign-in method.
4. Select **Web Application** as the Application type.
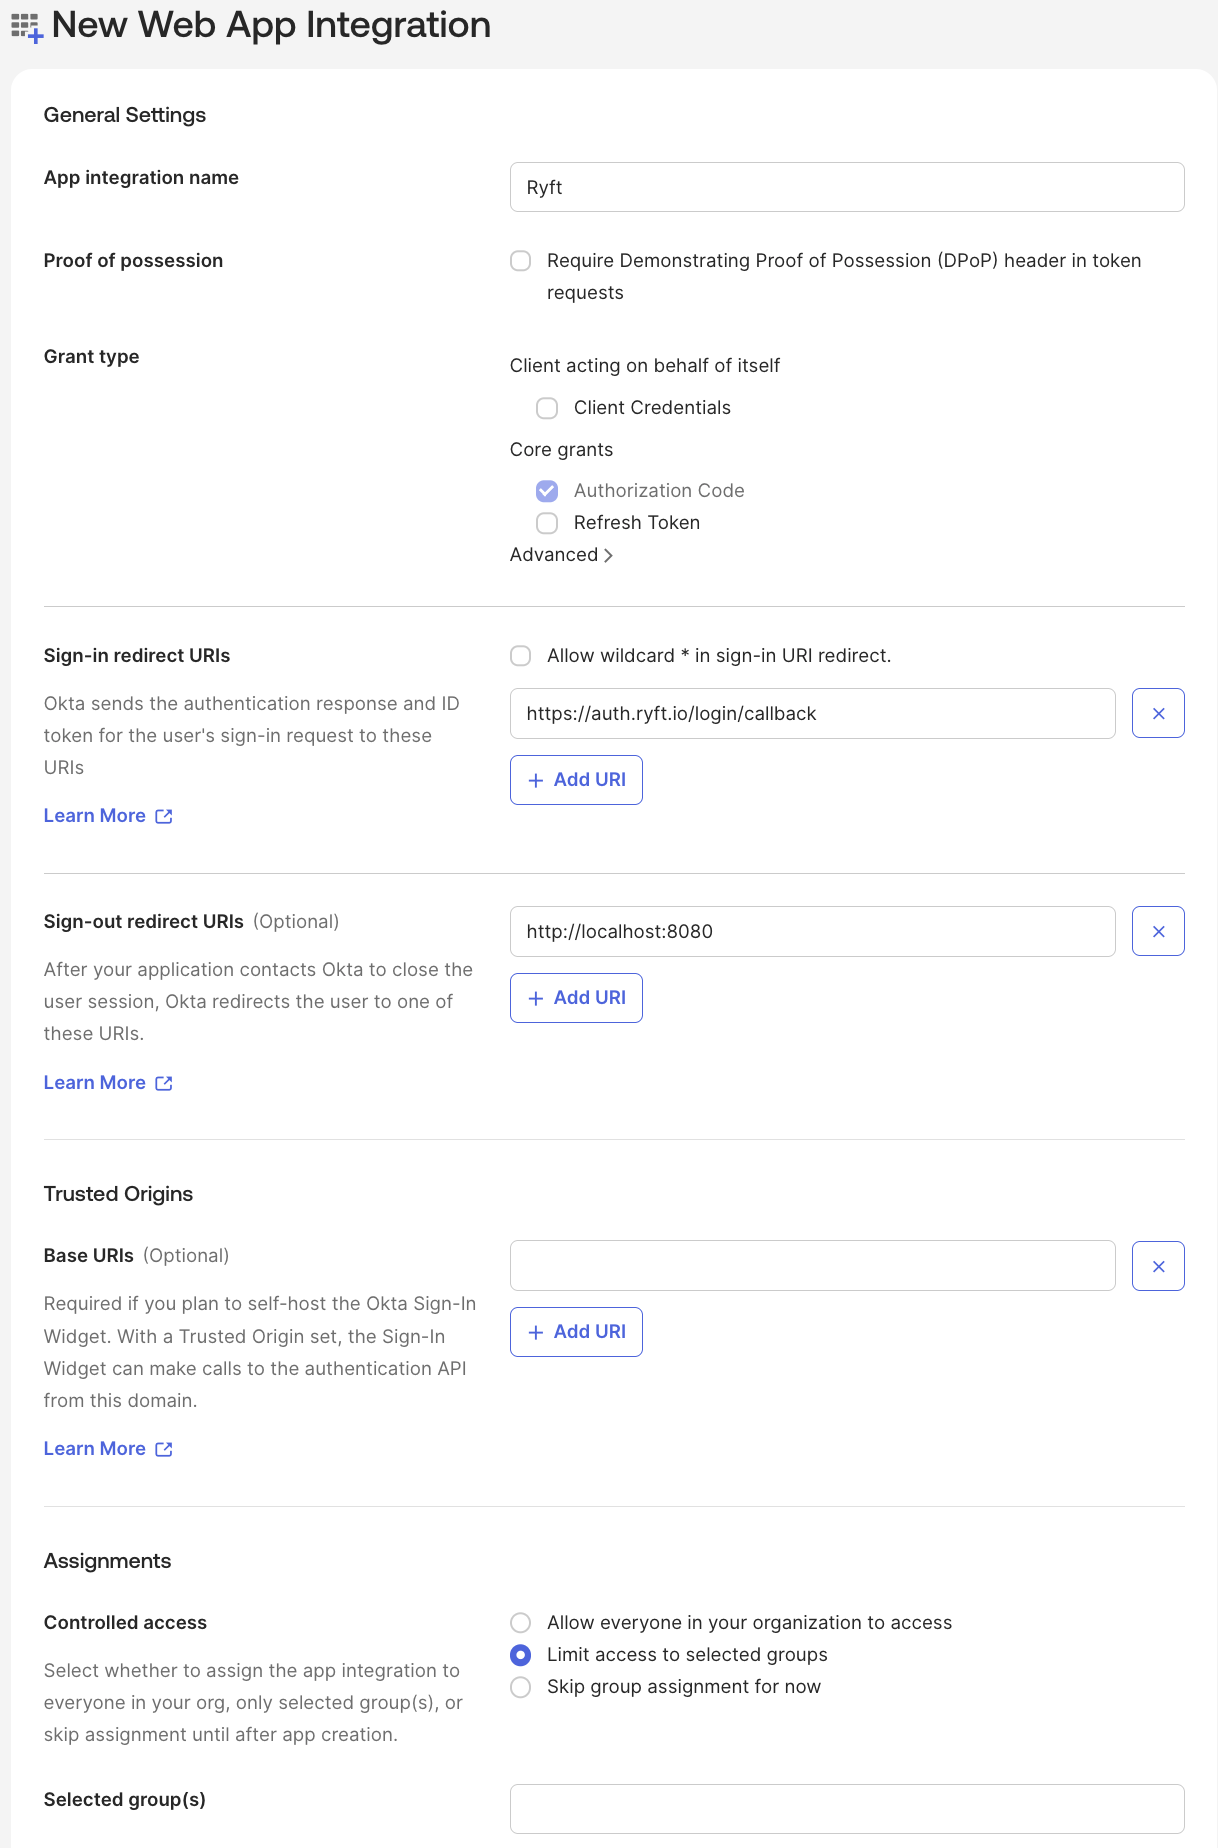
 5. Set **App Integration Name** to "Ryft" (or any name you prefer).
6. Only select **Authorization Code** under the **Grant type** section.
7. Set **Sign-in redirect URIs** to `https://auth.ryft.io/login/callback`
8. Choose the relevant **Assignments** for your organization.
9. Send your Ryft representative the **Client ID**, **Client Secret** and **Okta Domain**.
5. Set **App Integration Name** to "Ryft" (or any name you prefer).
6. Only select **Authorization Code** under the **Grant type** section.
7. Set **Sign-in redirect URIs** to `https://auth.ryft.io/login/callback`
8. Choose the relevant **Assignments** for your organization.
9. Send your Ryft representative the **Client ID**, **Client Secret** and **Okta Domain**.
 10. Download the following Ryft logo and edit the application to add the logo so it's easily recognizable by users:
 To limit access to specific IP ranges, you can configure your Okta application using the following [guide](https://support.okta.com/help/s/article/How-to-Allow-Access-to-the-Okta-Applications-Only-From-a-Specific-IP-Range?language=en_US).
### Creating an application link (optional)
1. Click on the Ryft application you just created.
2. Navigate to **General settings** and click **Edit**
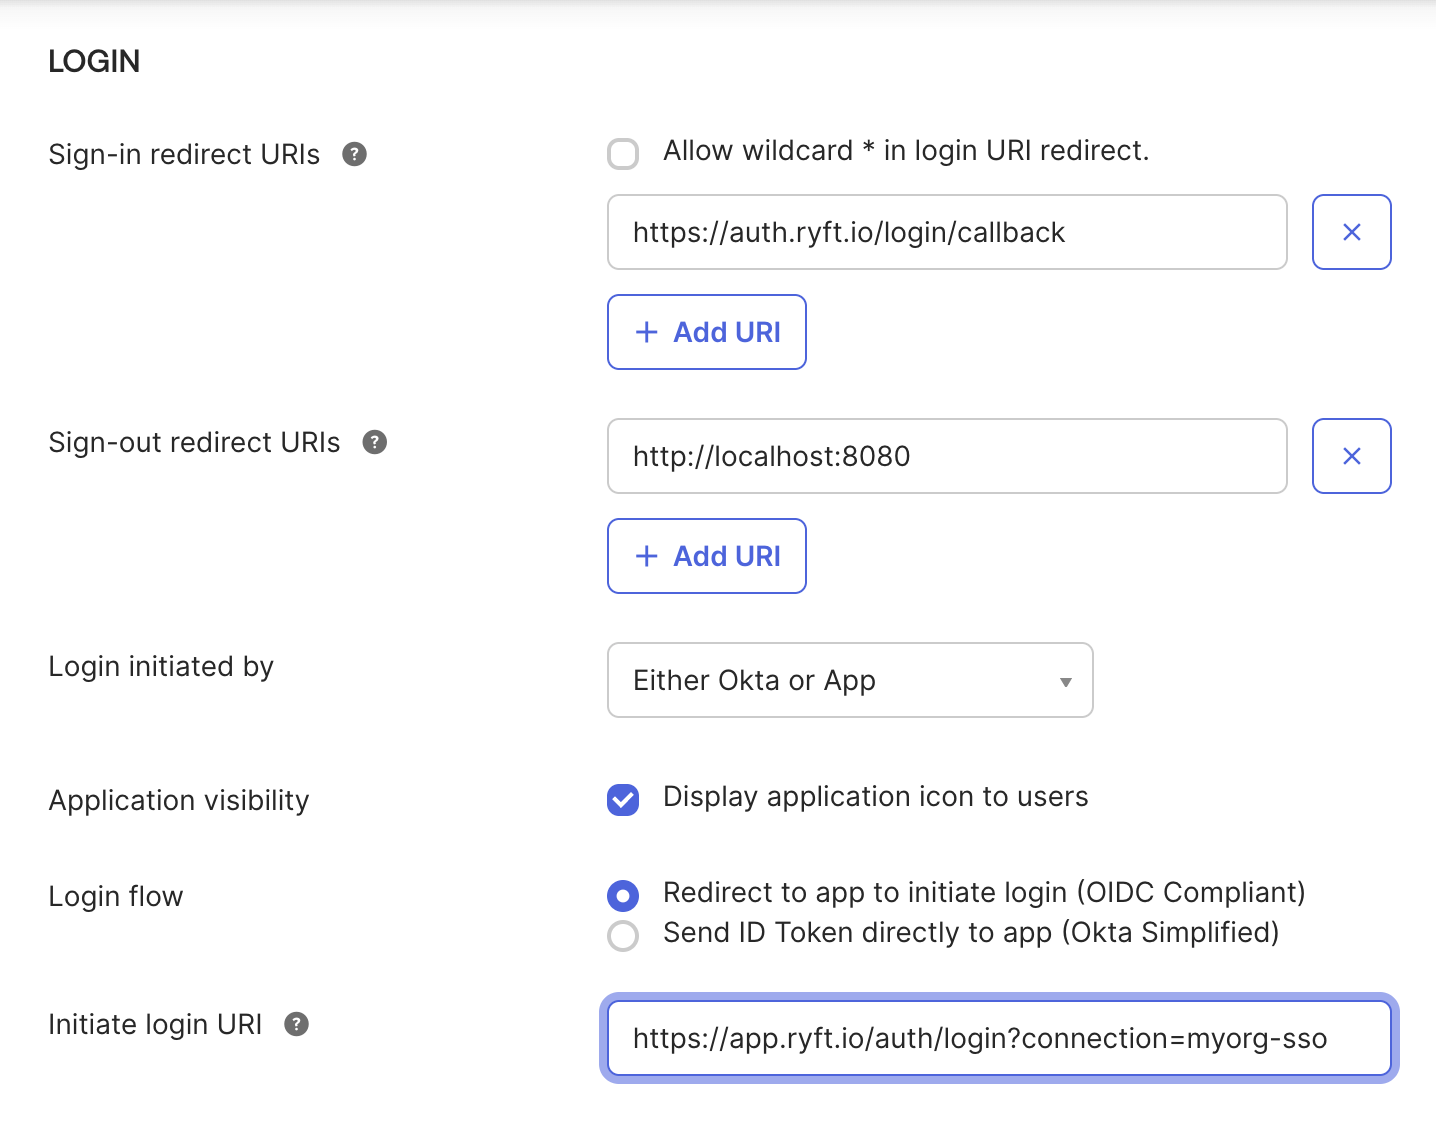
3. Set **Login initiated by** to **Either Okta or App**
4. Select **Display application icon to users**
5. Select **Redirect to app to initiate login (OIDC Compliant)** under **Login Flow**
6. Set **Initiate login URI** to **[https://app.ryft.io/auth/login?connection=\{myorg}-sso](https://app.ryft.io/auth/login?connection=\{myorg}-sso)**
* Note - replace `{myorg}` with your Ryft organization name. If your organization name is "acme", the URI would be: `https://app.ryft.io/auth/login?connection=acme-sso`
7. Click **Save**
To limit access to specific IP ranges, you can configure your Okta application using the following [guide](https://support.okta.com/help/s/article/How-to-Allow-Access-to-the-Okta-Applications-Only-From-a-Specific-IP-Range?language=en_US).
### Creating an application link (optional)
1. Click on the Ryft application you just created.
2. Navigate to **General settings** and click **Edit**
3. Set **Login initiated by** to **Either Okta or App**
4. Select **Display application icon to users**
5. Select **Redirect to app to initiate login (OIDC Compliant)** under **Login Flow**
6. Set **Initiate login URI** to **[https://app.ryft.io/auth/login?connection=\{myorg}-sso](https://app.ryft.io/auth/login?connection=\{myorg}-sso)**
* Note - replace `{myorg}` with your Ryft organization name. If your organization name is "acme", the URI would be: `https://app.ryft.io/auth/login?connection=acme-sso`
7. Click **Save**
 Done! You have successfully configured Okta SSO for your Ryft organization. Users can now log in to Ryft using their Okta profile.