> ## Documentation Index
> Fetch the complete documentation index at: https://docs.ryft.io/llms.txt
> Use this file to discover all available pages before exploring further.
# Starburst Galaxy
> Connect Starburst Galaxy to Ryft to sync query history, tables, and views.
### Prerequisites
Before beginning the setup, make sure you have the following privileges (usually, you should reach out to an administrator with access to the `accountadmin` role):
* `Manage service account`
* `Create role`
* `Manage security`
* `Create cluster`
***
## Step 1: Creating the Role
**1.** Navigate to **Admin** > **Access** > **Roles and privileges** in the Starburst Galaxy sidebar
**2.** Click **Add role** to create a new role
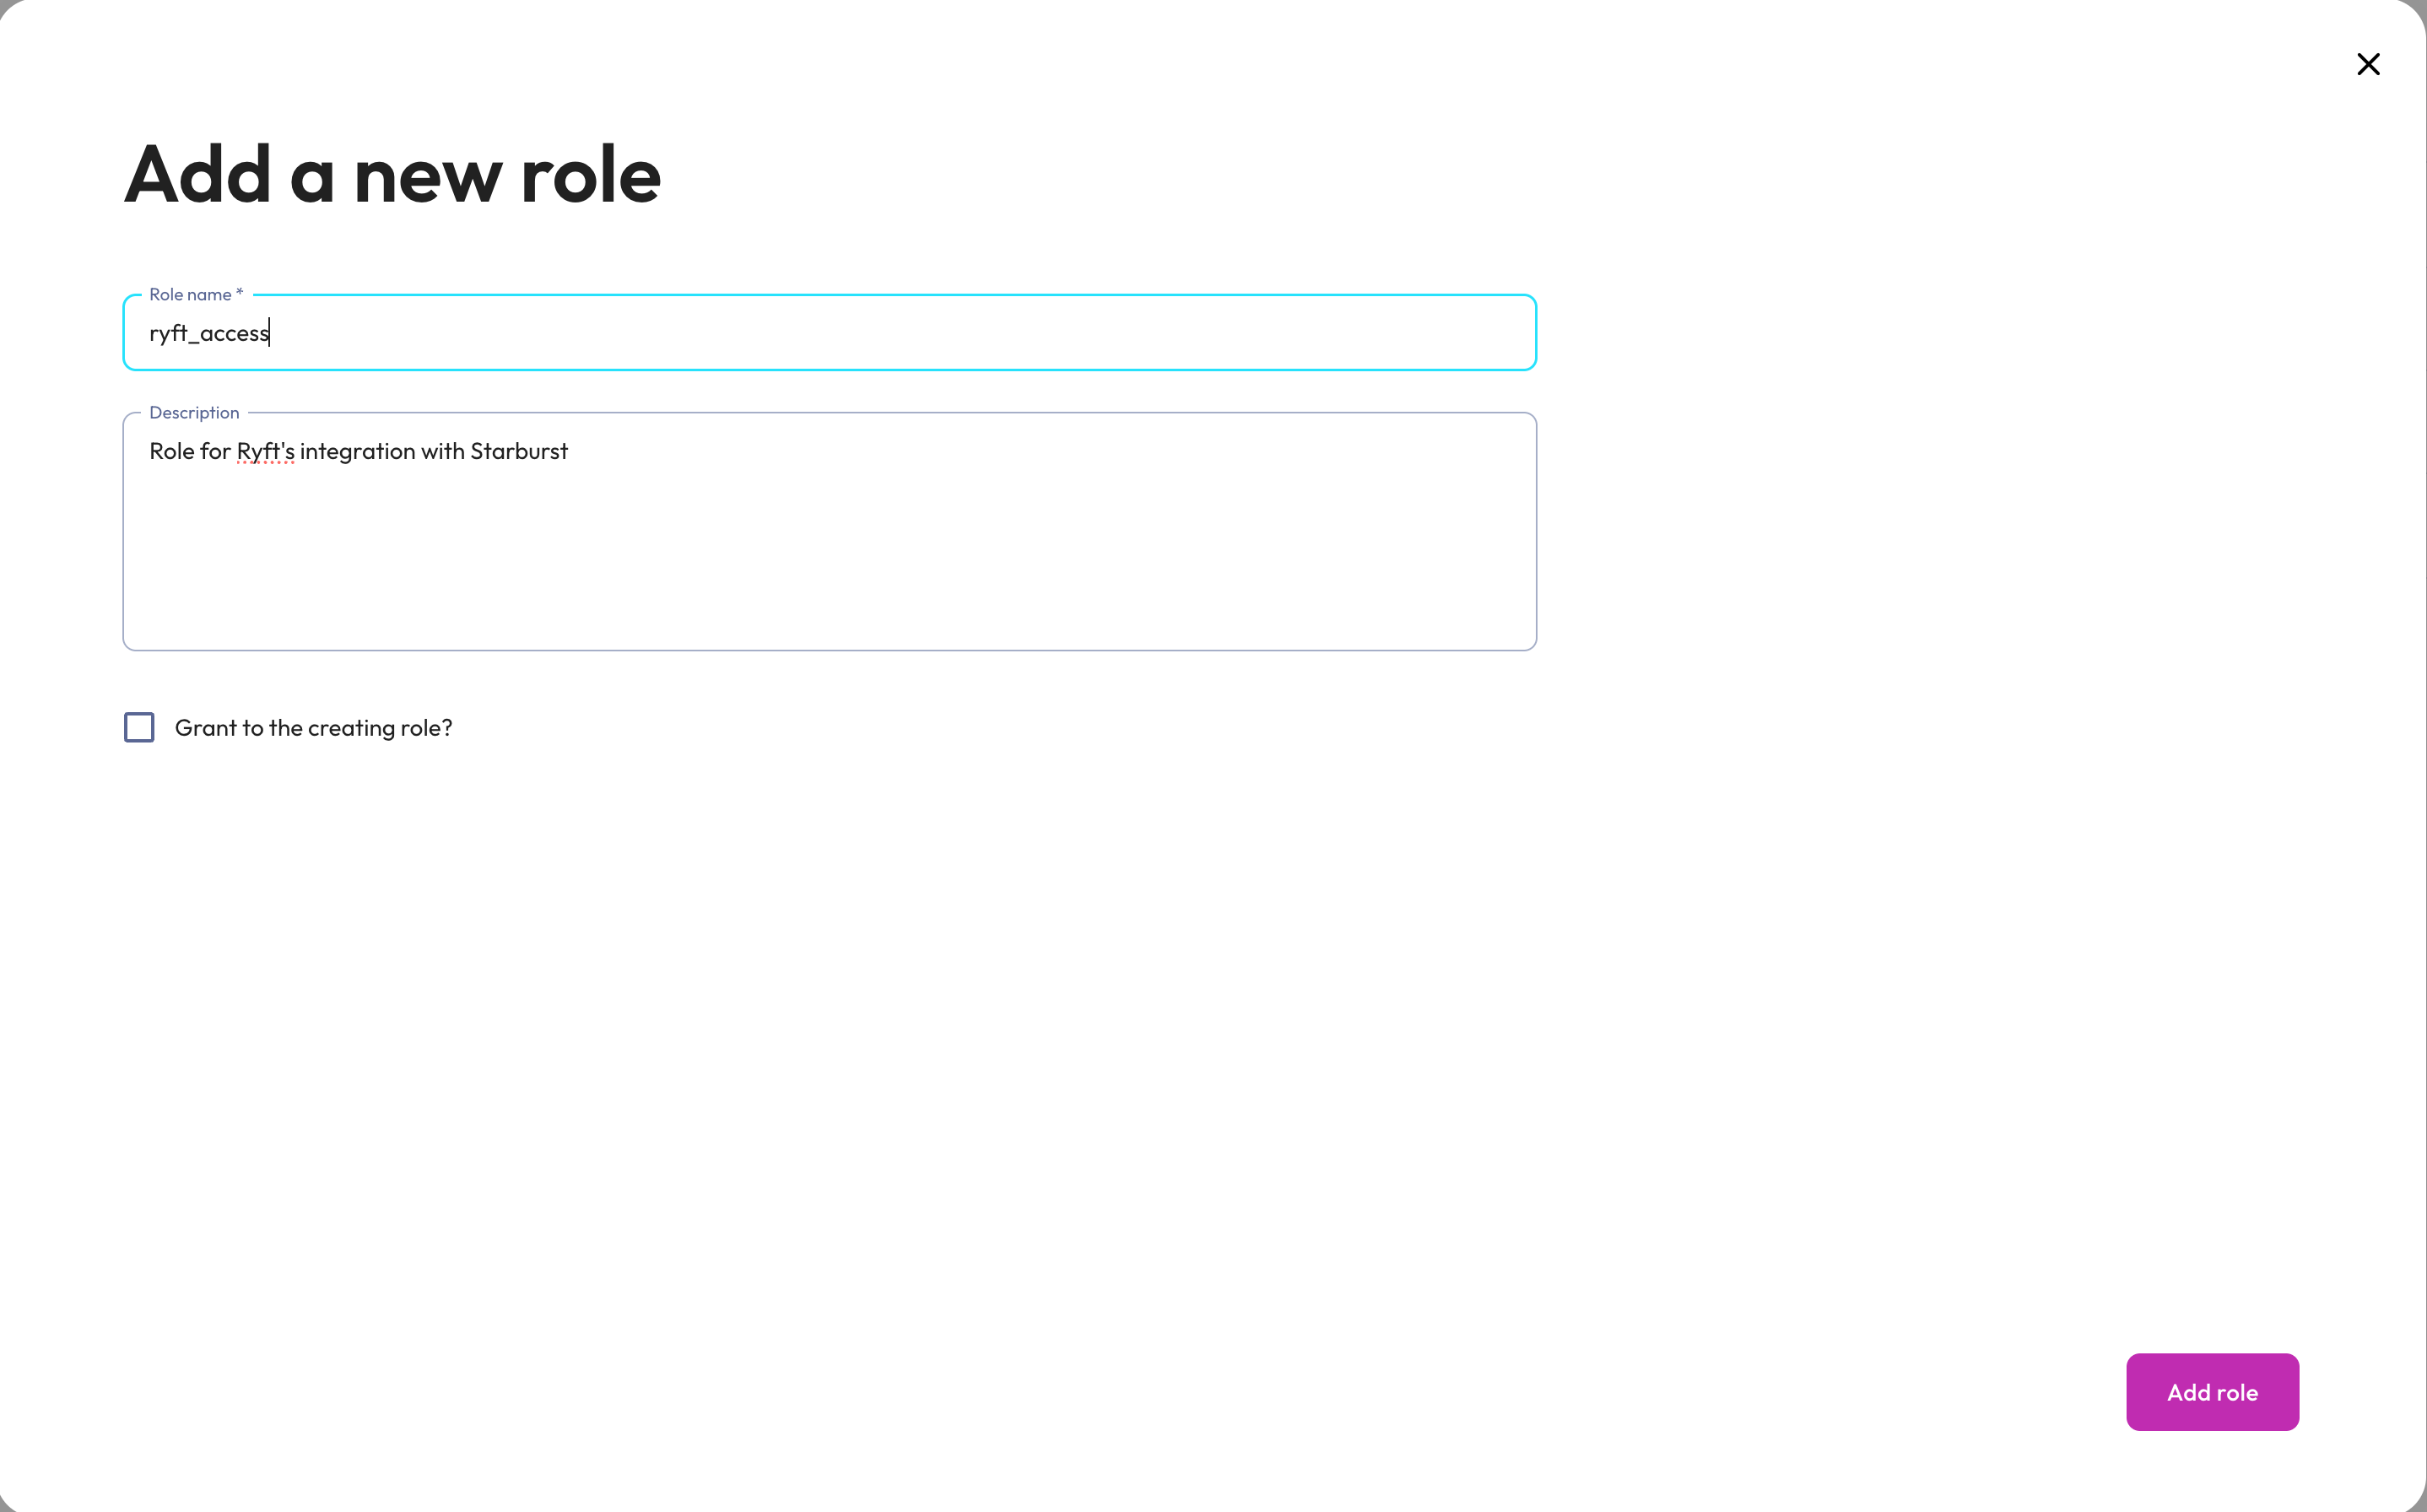
**3.** Configure the role:
* **Role name**: `ryft_access`
* Click **Add role**
 ***
## Step 2: Granting Role Access
In this step, you will configure Ryft’s role to access Starburst metadata and logs, namely:
* Tables and views schema information
* Query logs
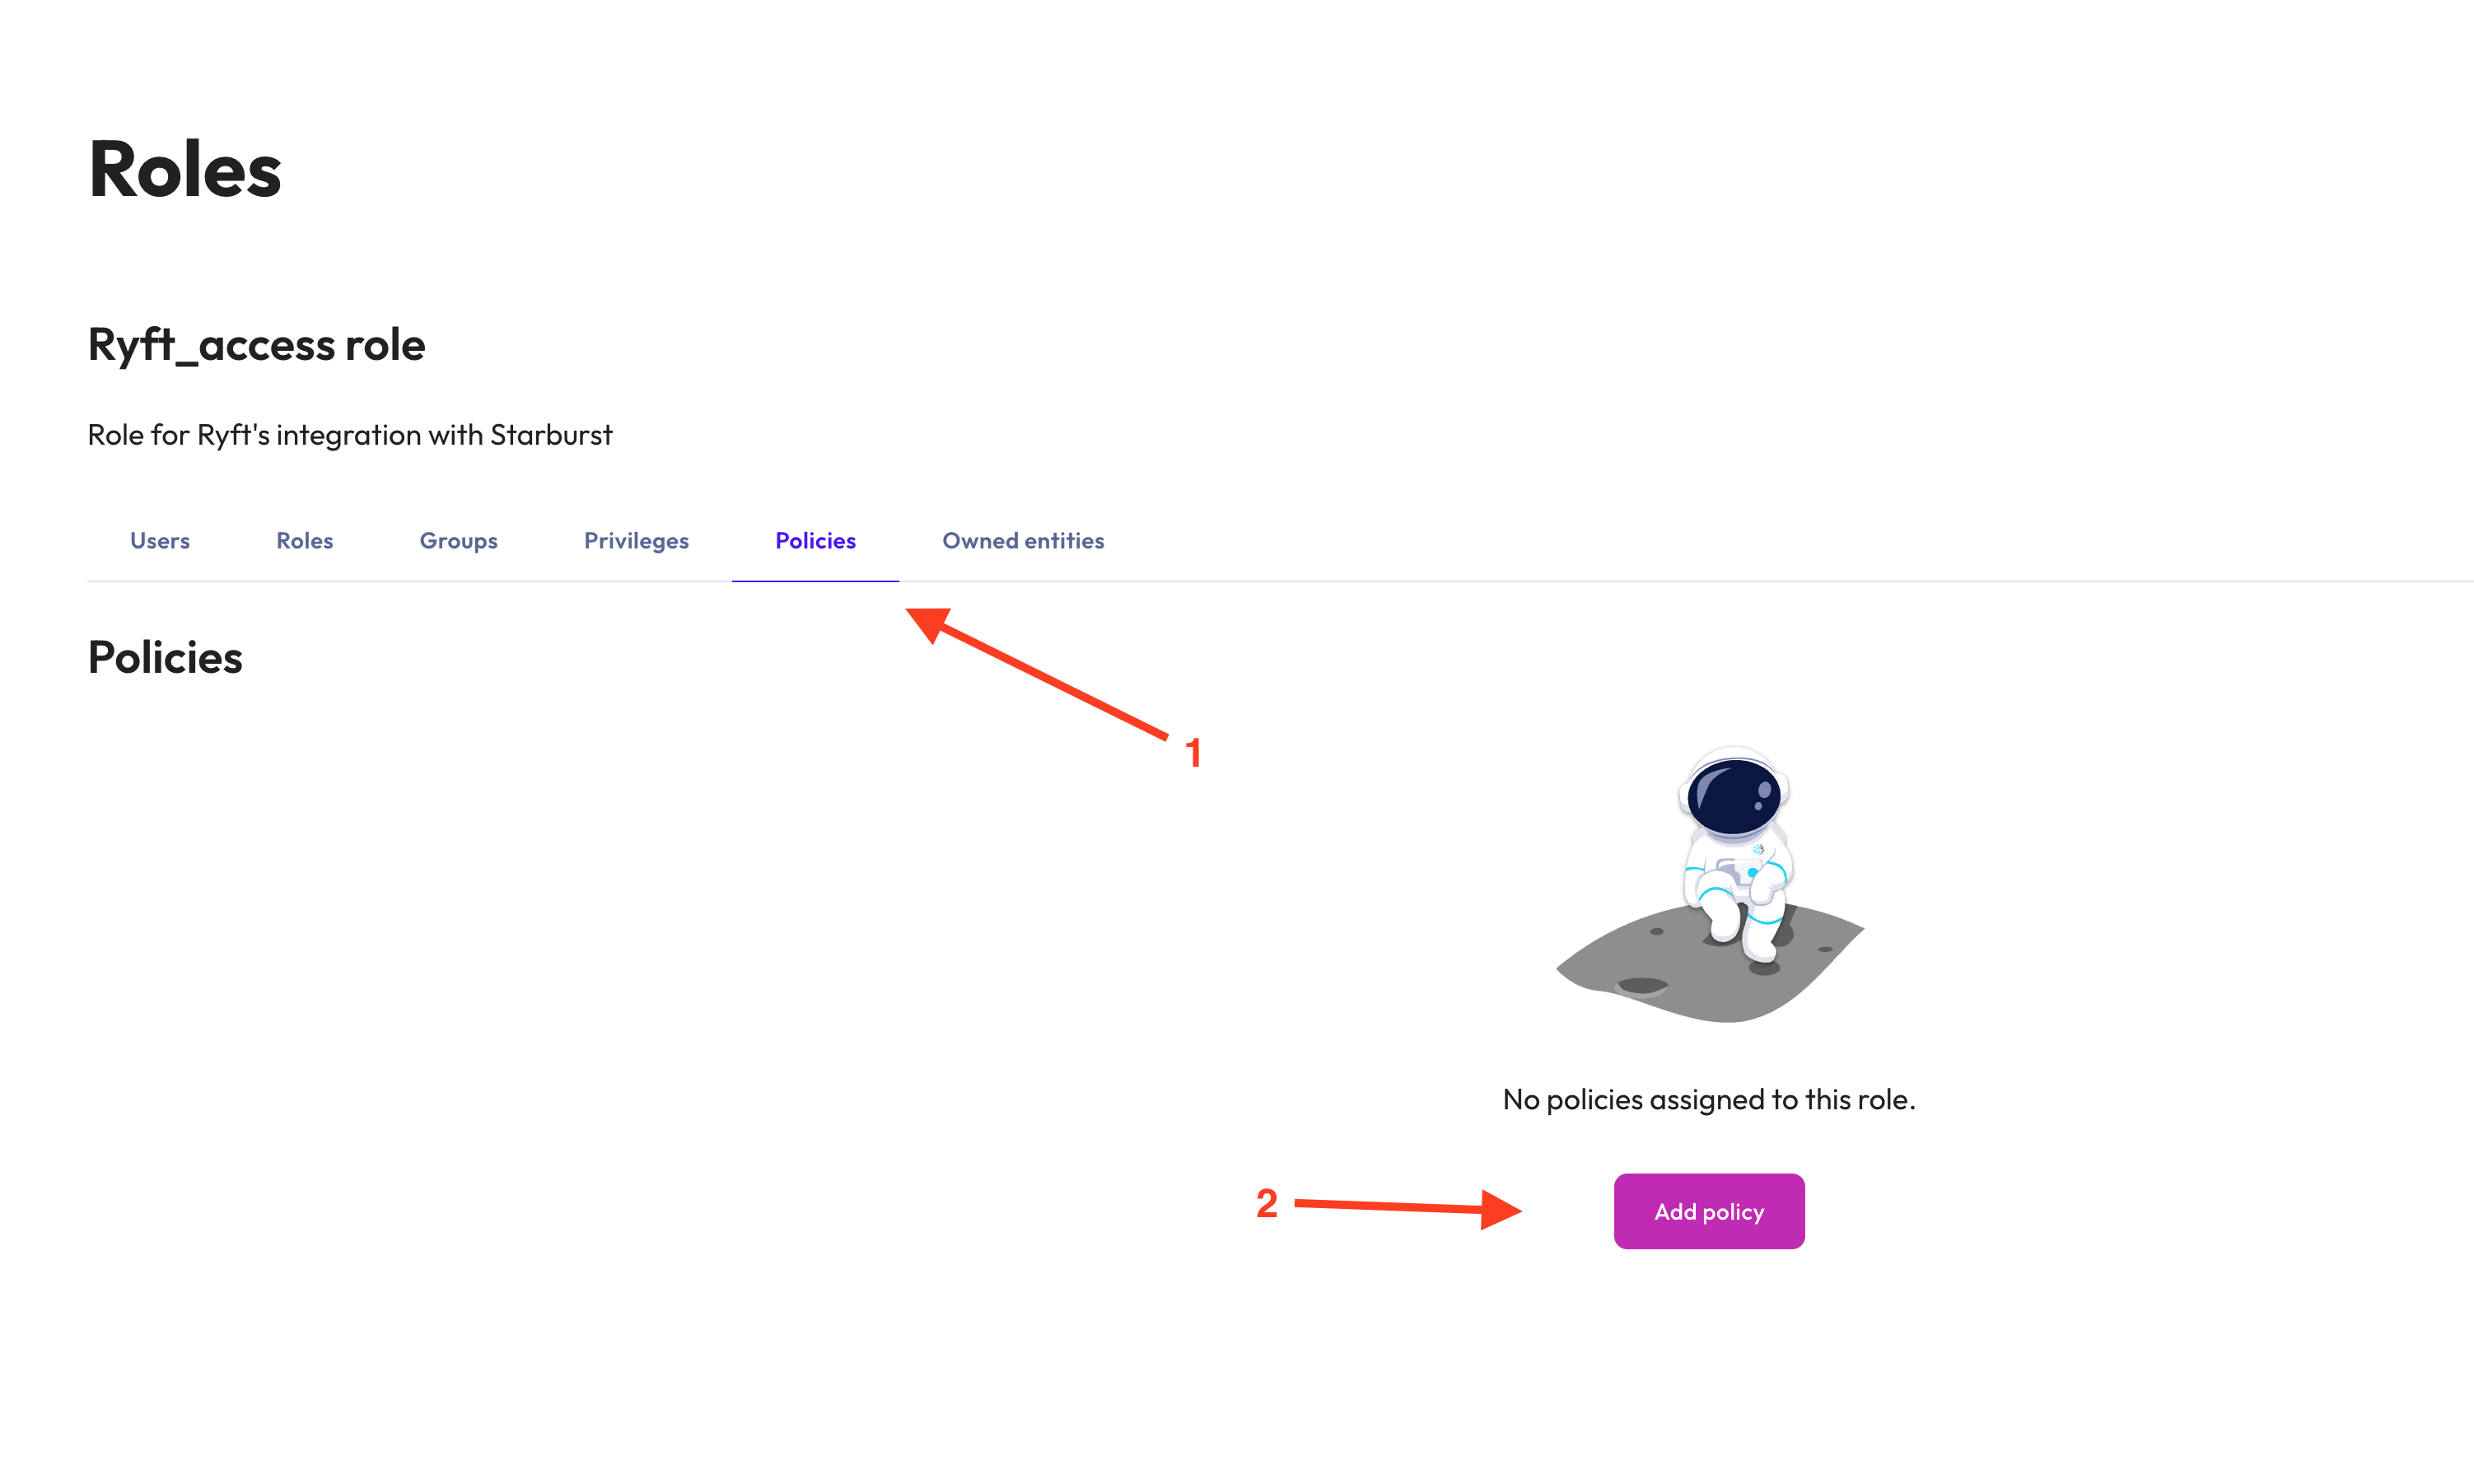
**1.** Click on the **ryft\_access** role, then navigate to the **Policies** tab
**2.** Click **Add policy** to create a new policy
***
## Step 2: Granting Role Access
In this step, you will configure Ryft’s role to access Starburst metadata and logs, namely:
* Tables and views schema information
* Query logs
**1.** Click on the **ryft\_access** role, then navigate to the **Policies** tab
**2.** Click **Add policy** to create a new policy
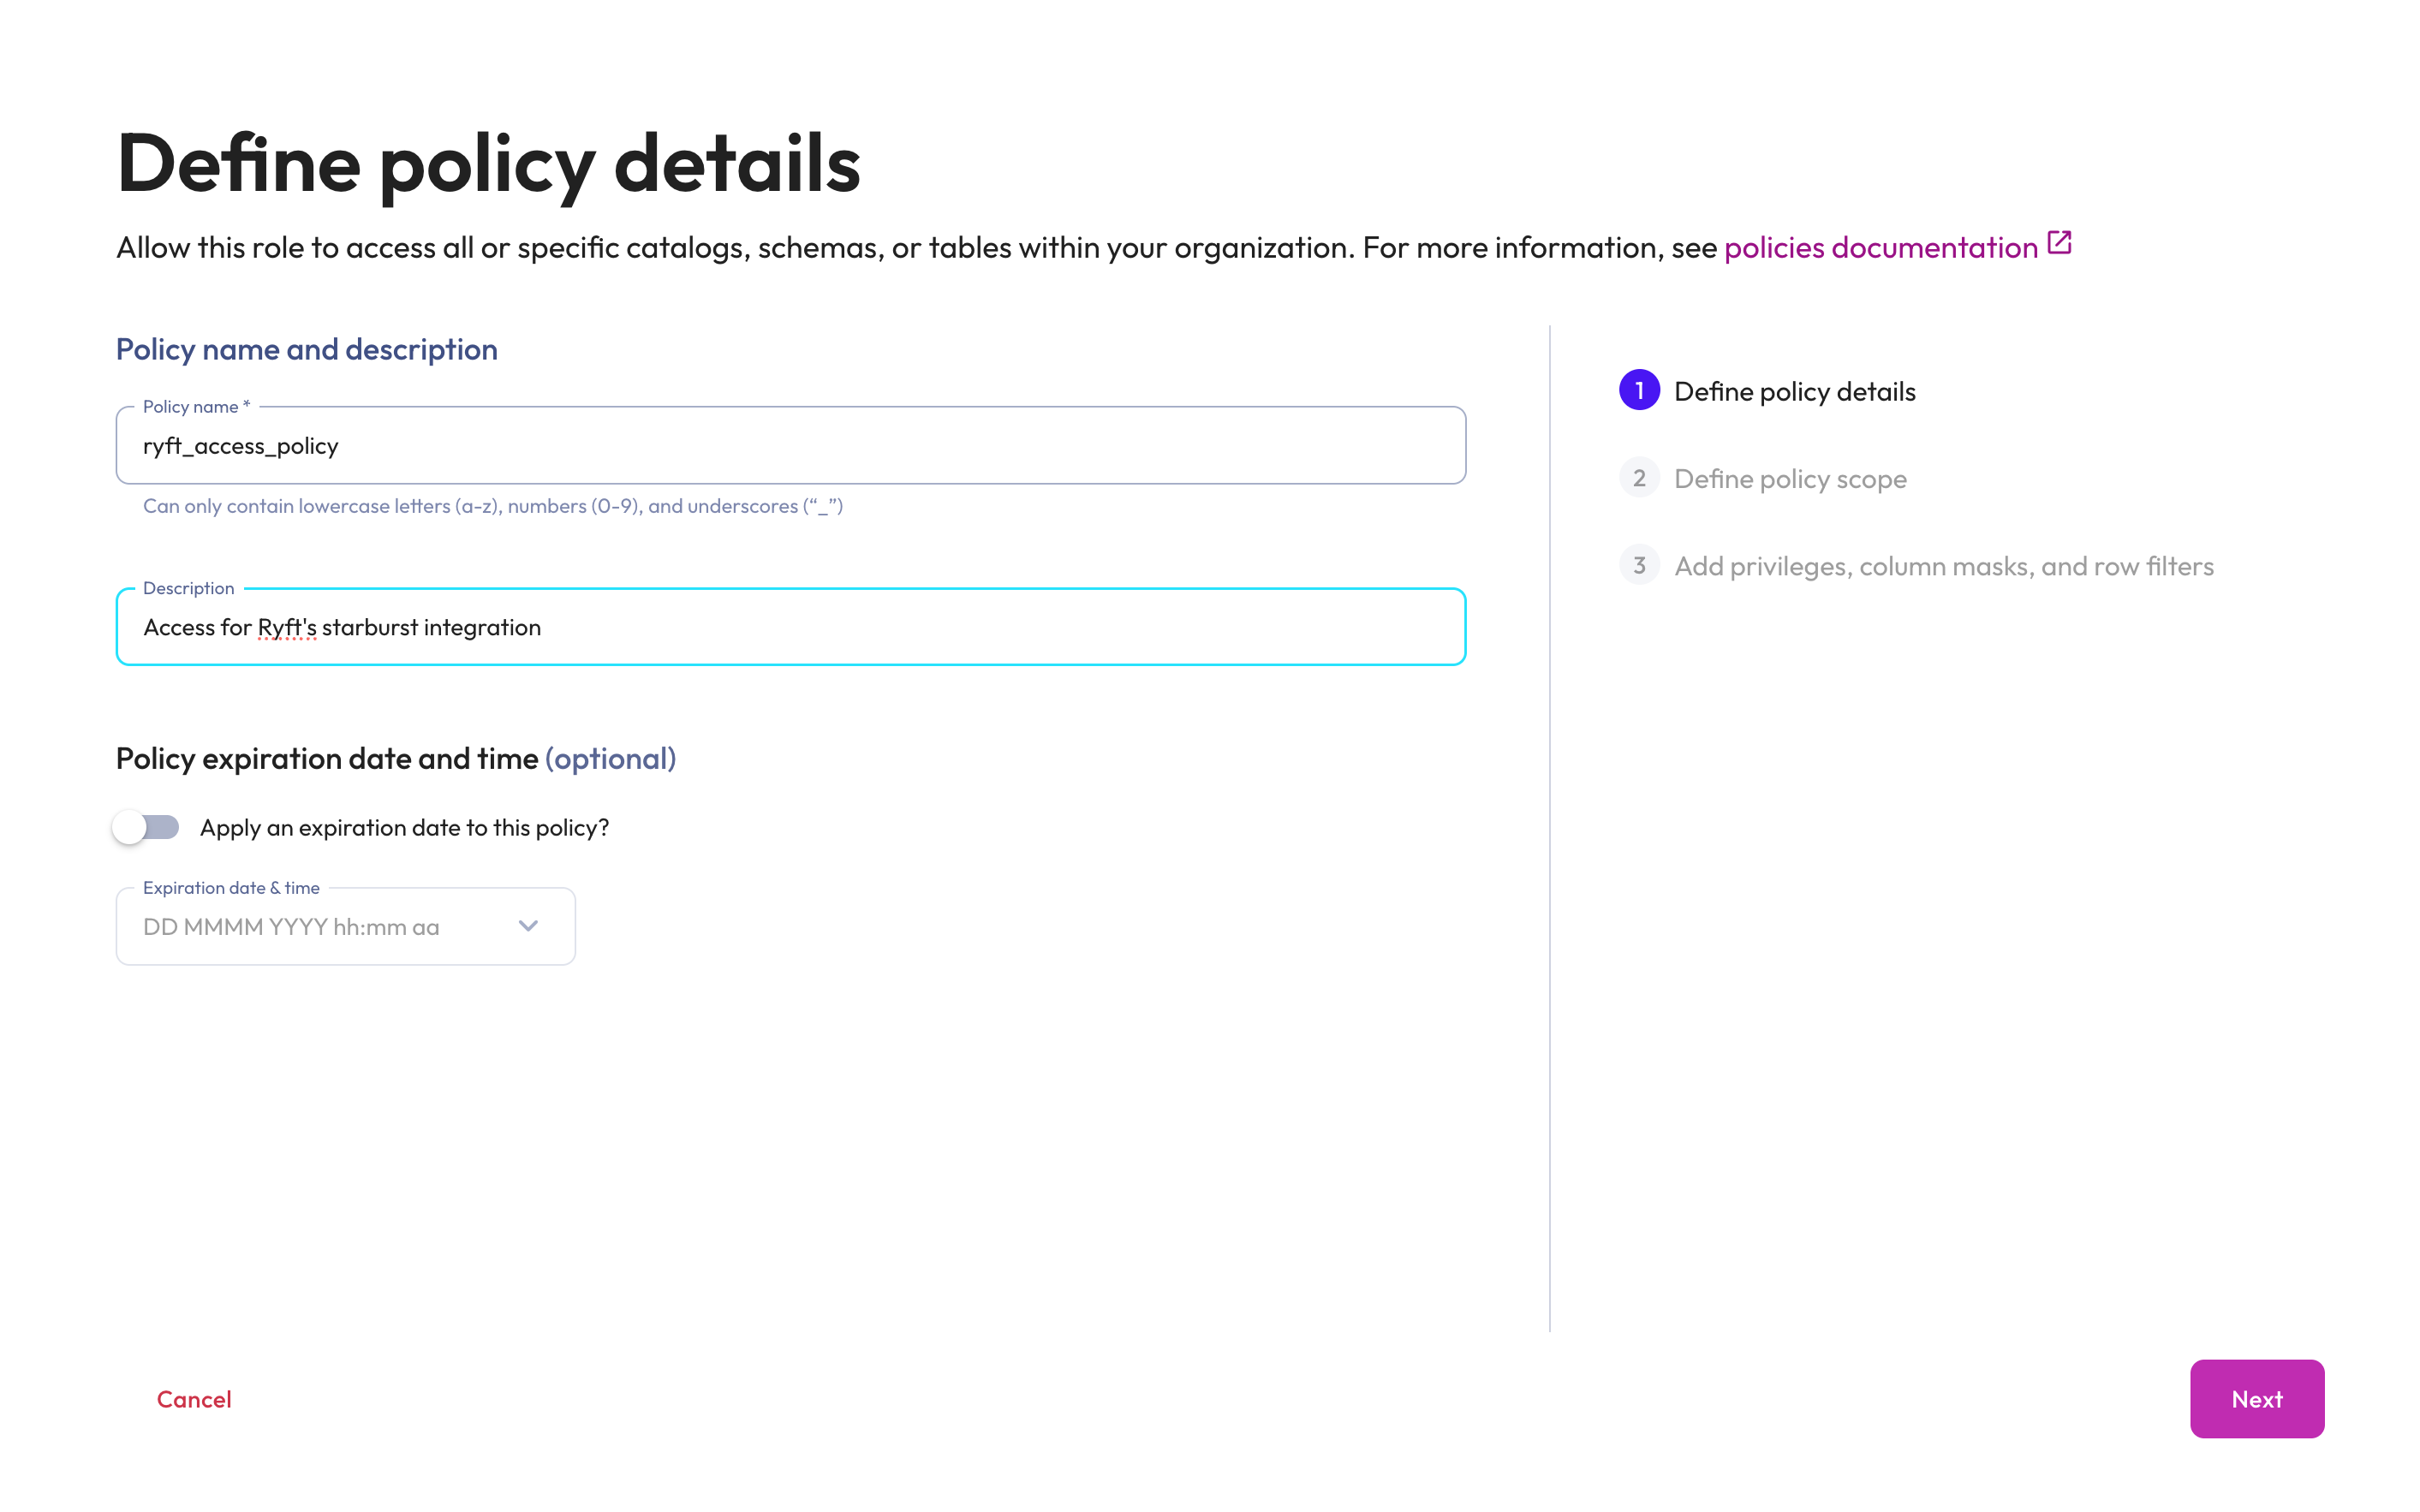
 **3.** Under "Define policy details", set the policy name and description:
* **Policy name**: `ryft_access_policy`
* **Description**: Access for Ryft's Starburst integration
* Click **Next**
**3.** Under "Define policy details", set the policy name and description:
* **Policy name**: `ryft_access_policy`
* **Description**: Access for Ryft's Starburst integration
* Click **Next**
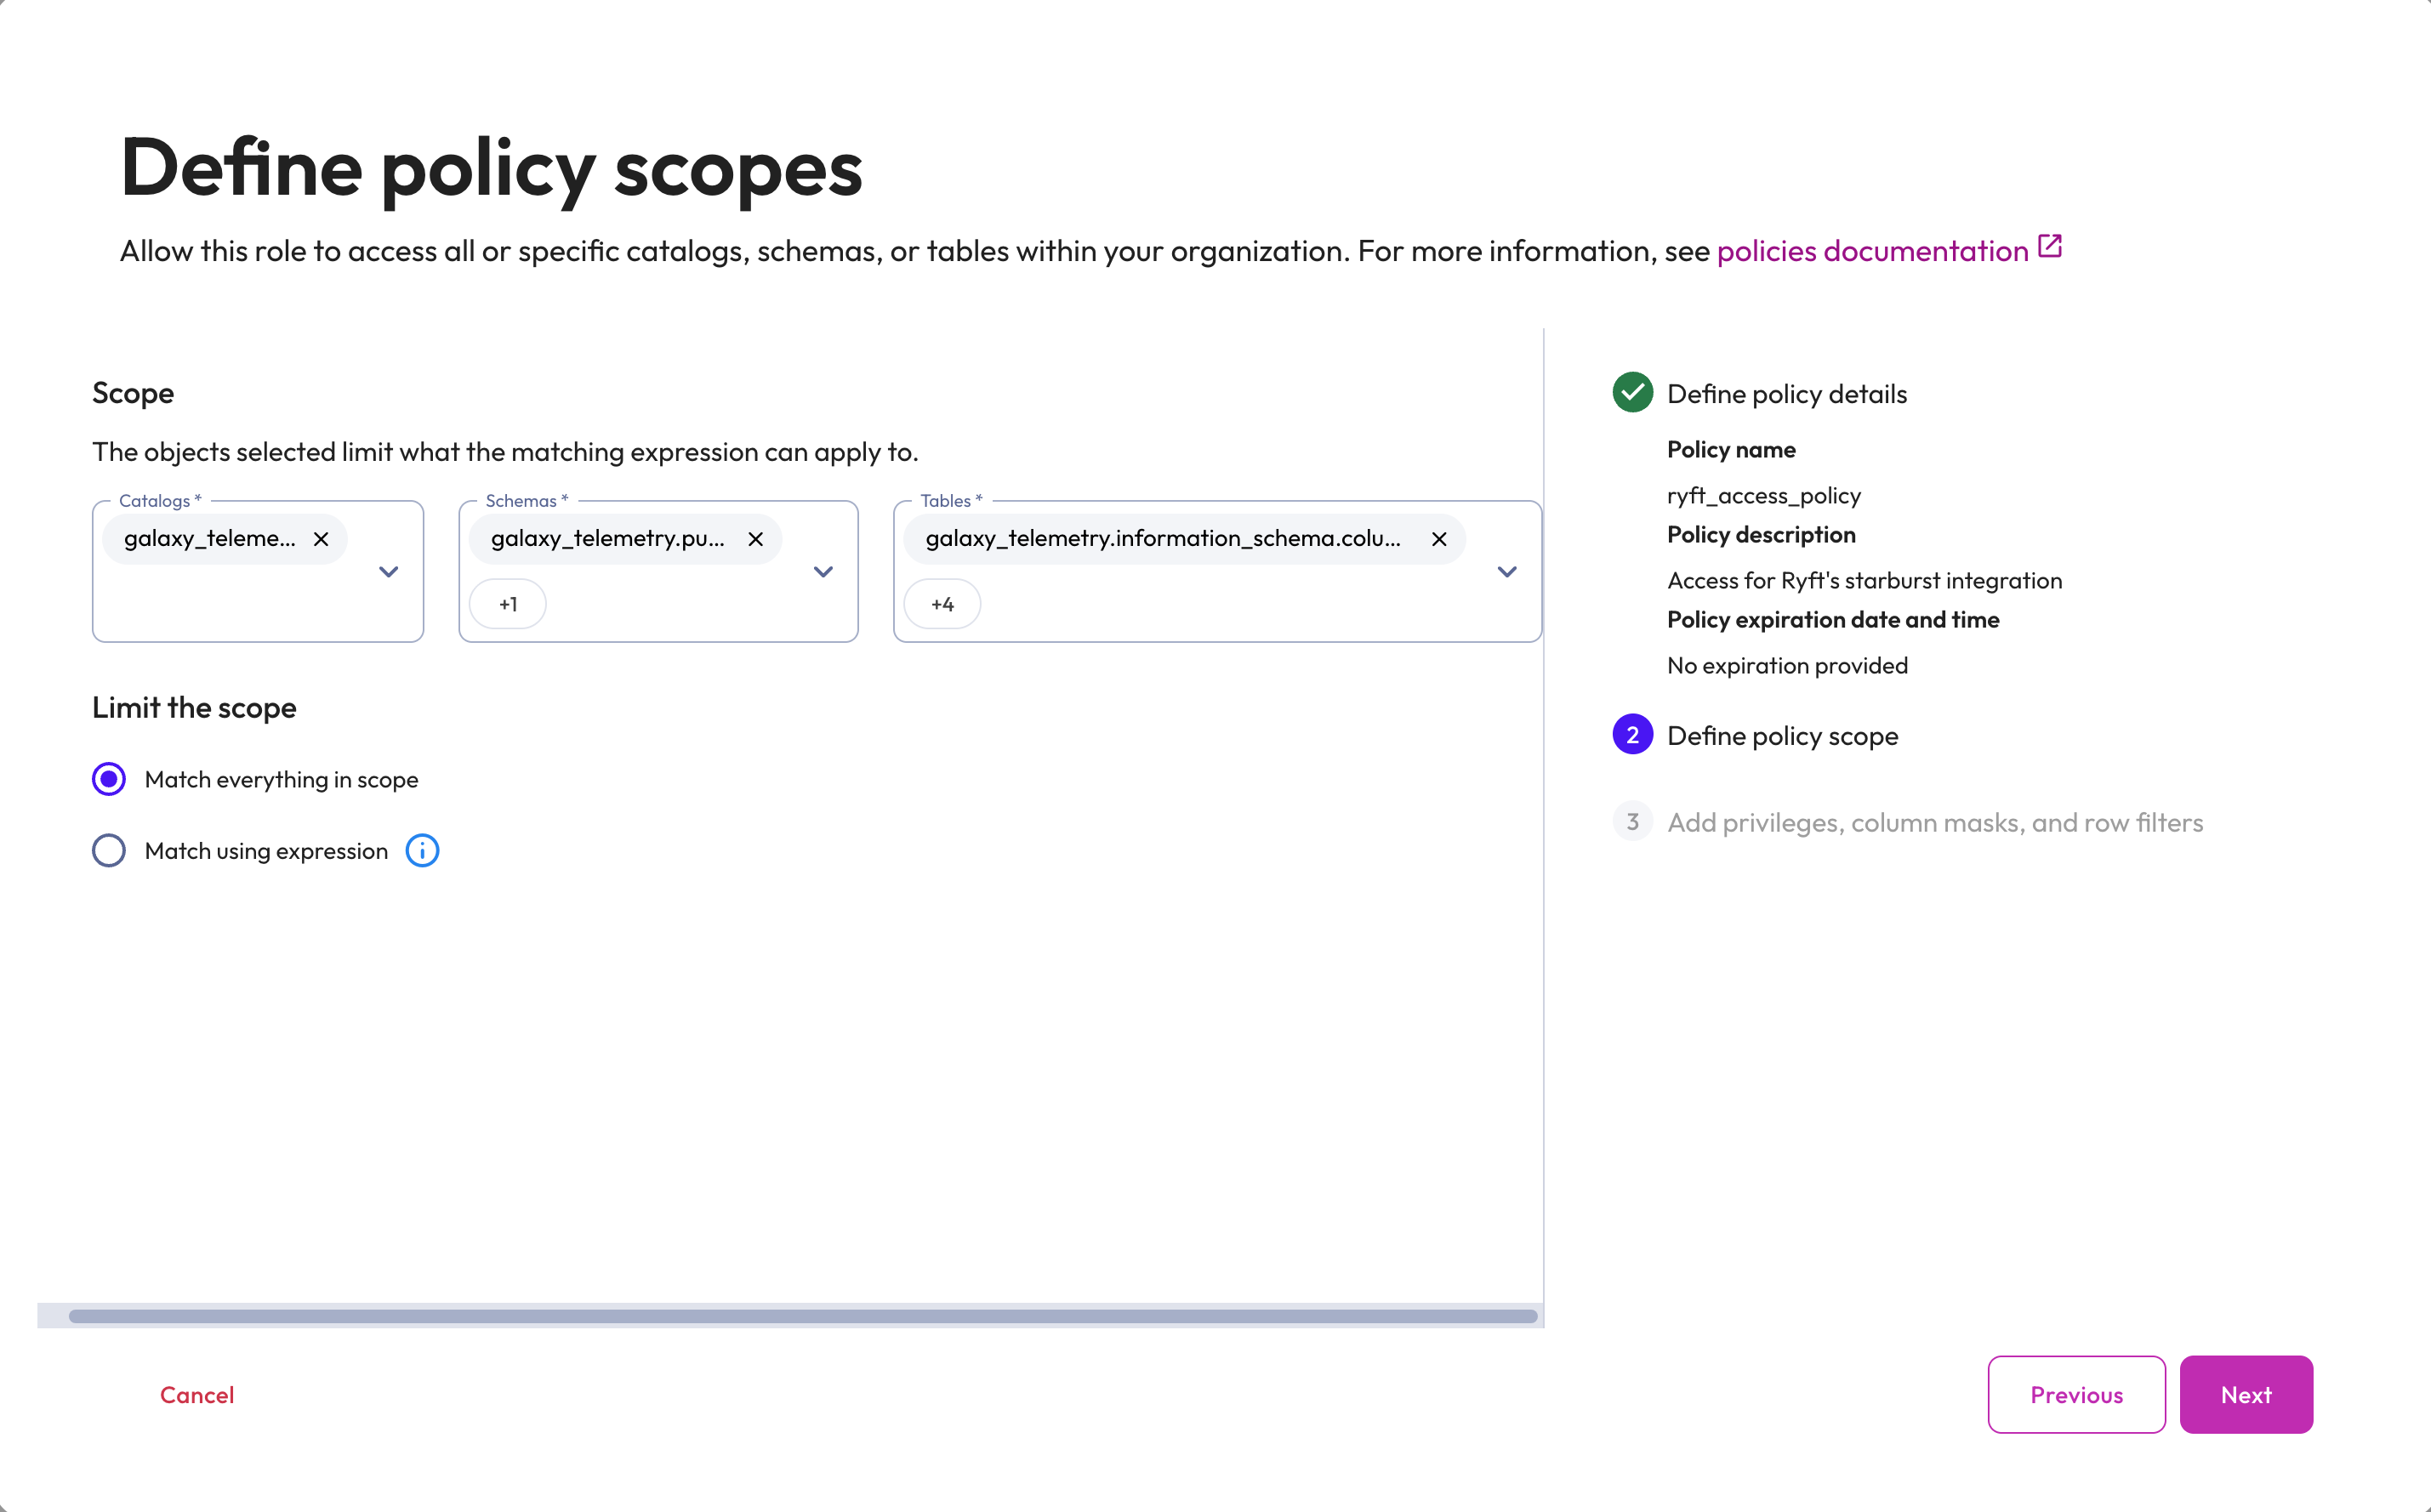
 **4.** Under "Define policy scopes", select the data scope for the following metadata tables:
* **Catalogs**: Select `galaxy_telemetry`
* **Schemas**: Select the following schemas:
* `galaxy_telemetry.information_schema`
* `galaxy_telemetry.public`
* **Tables**: Select the following tables:
* `galaxy_telemetry.information_schema.schemata`
* `galaxy_telemetry.information_schema.tables`
* `galaxy_telemetry.information_schema.columns`
* `galaxy_telemetry.information_schema.views`
* `galaxy_telemetry.public.query_history`
* Choose **Match everything in scope**
* Click **Next**
**4.** Under "Define policy scopes", select the data scope for the following metadata tables:
* **Catalogs**: Select `galaxy_telemetry`
* **Schemas**: Select the following schemas:
* `galaxy_telemetry.information_schema`
* `galaxy_telemetry.public`
* **Tables**: Select the following tables:
* `galaxy_telemetry.information_schema.schemata`
* `galaxy_telemetry.information_schema.tables`
* `galaxy_telemetry.information_schema.columns`
* `galaxy_telemetry.information_schema.views`
* `galaxy_telemetry.public.query_history`
* Choose **Match everything in scope**
* Click **Next**
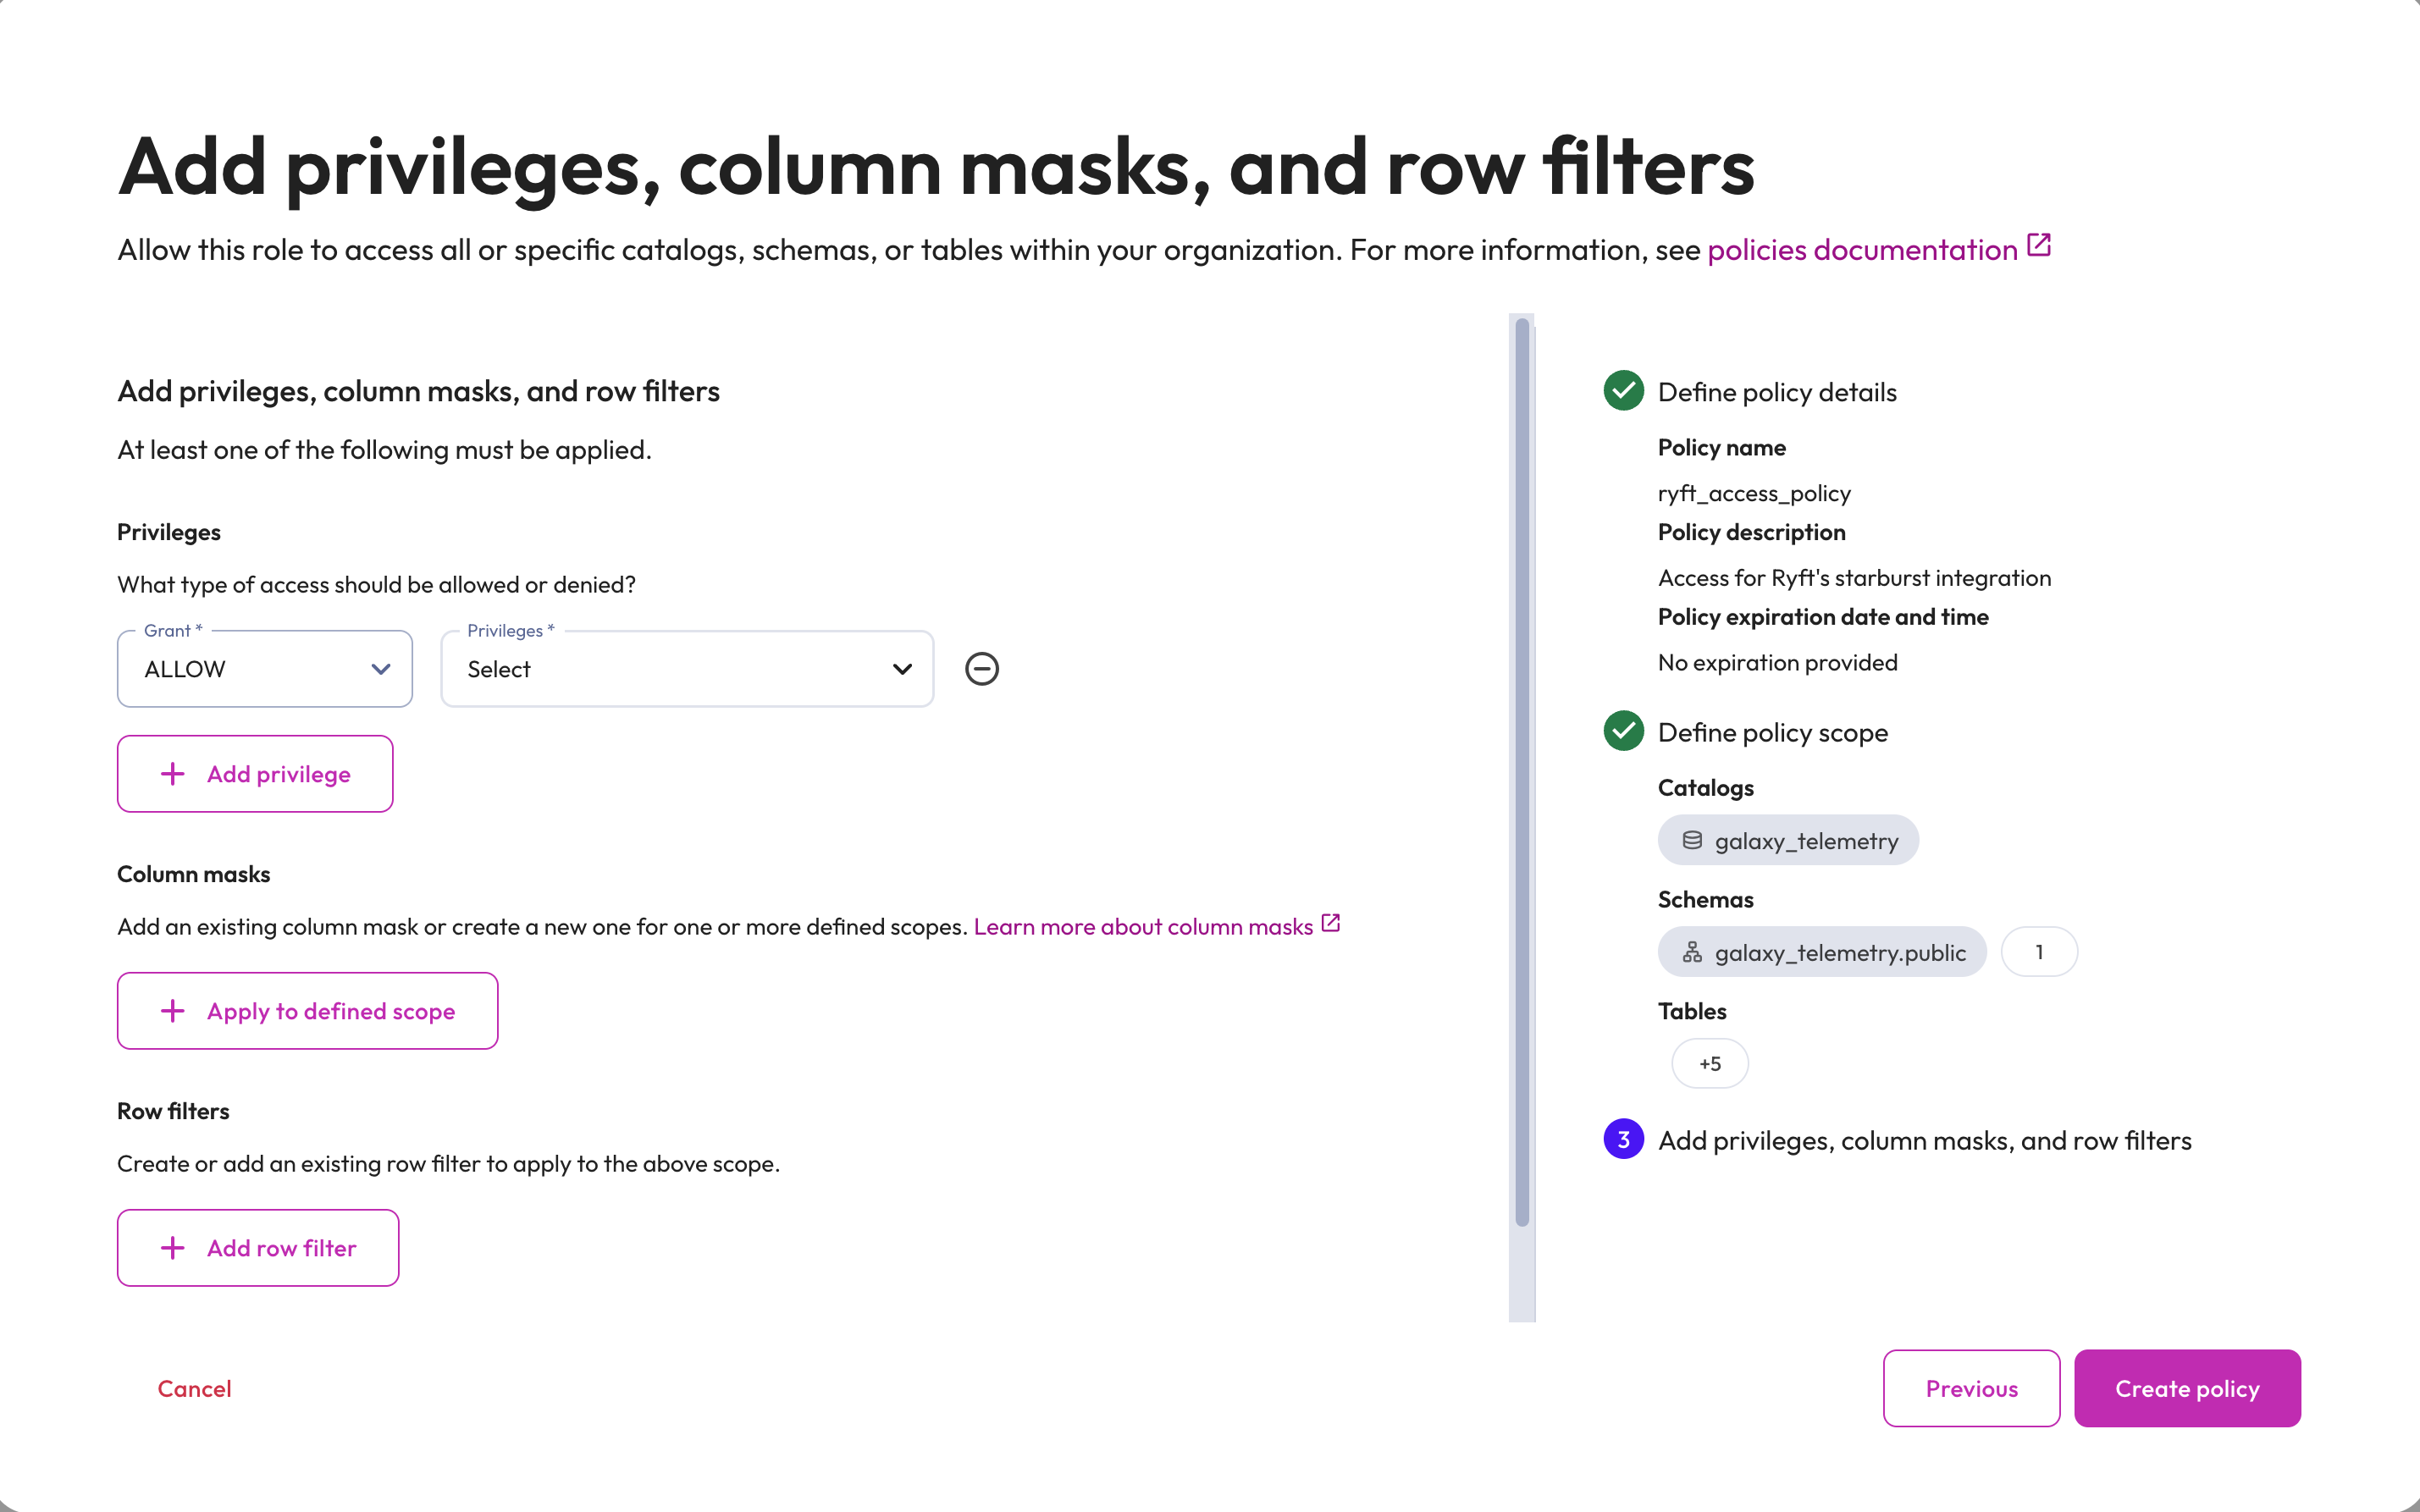
 **5.** Configure access permissions:
* **Grant**: ALLOW
* **Privileges**: Select (for read access)
* Click **Create policy**
**5.** Configure access permissions:
* **Grant**: ALLOW
* **Privileges**: Select (for read access)
* Click **Create policy**
 ***
**6.** Navigate to the **Privileges** tab and choose **Add privilege**
**7.** Choose the **Account** tab and click on **View all query history**
***
**6.** Navigate to the **Privileges** tab and choose **Add privilege**
**7.** Choose the **Account** tab and click on **View all query history**
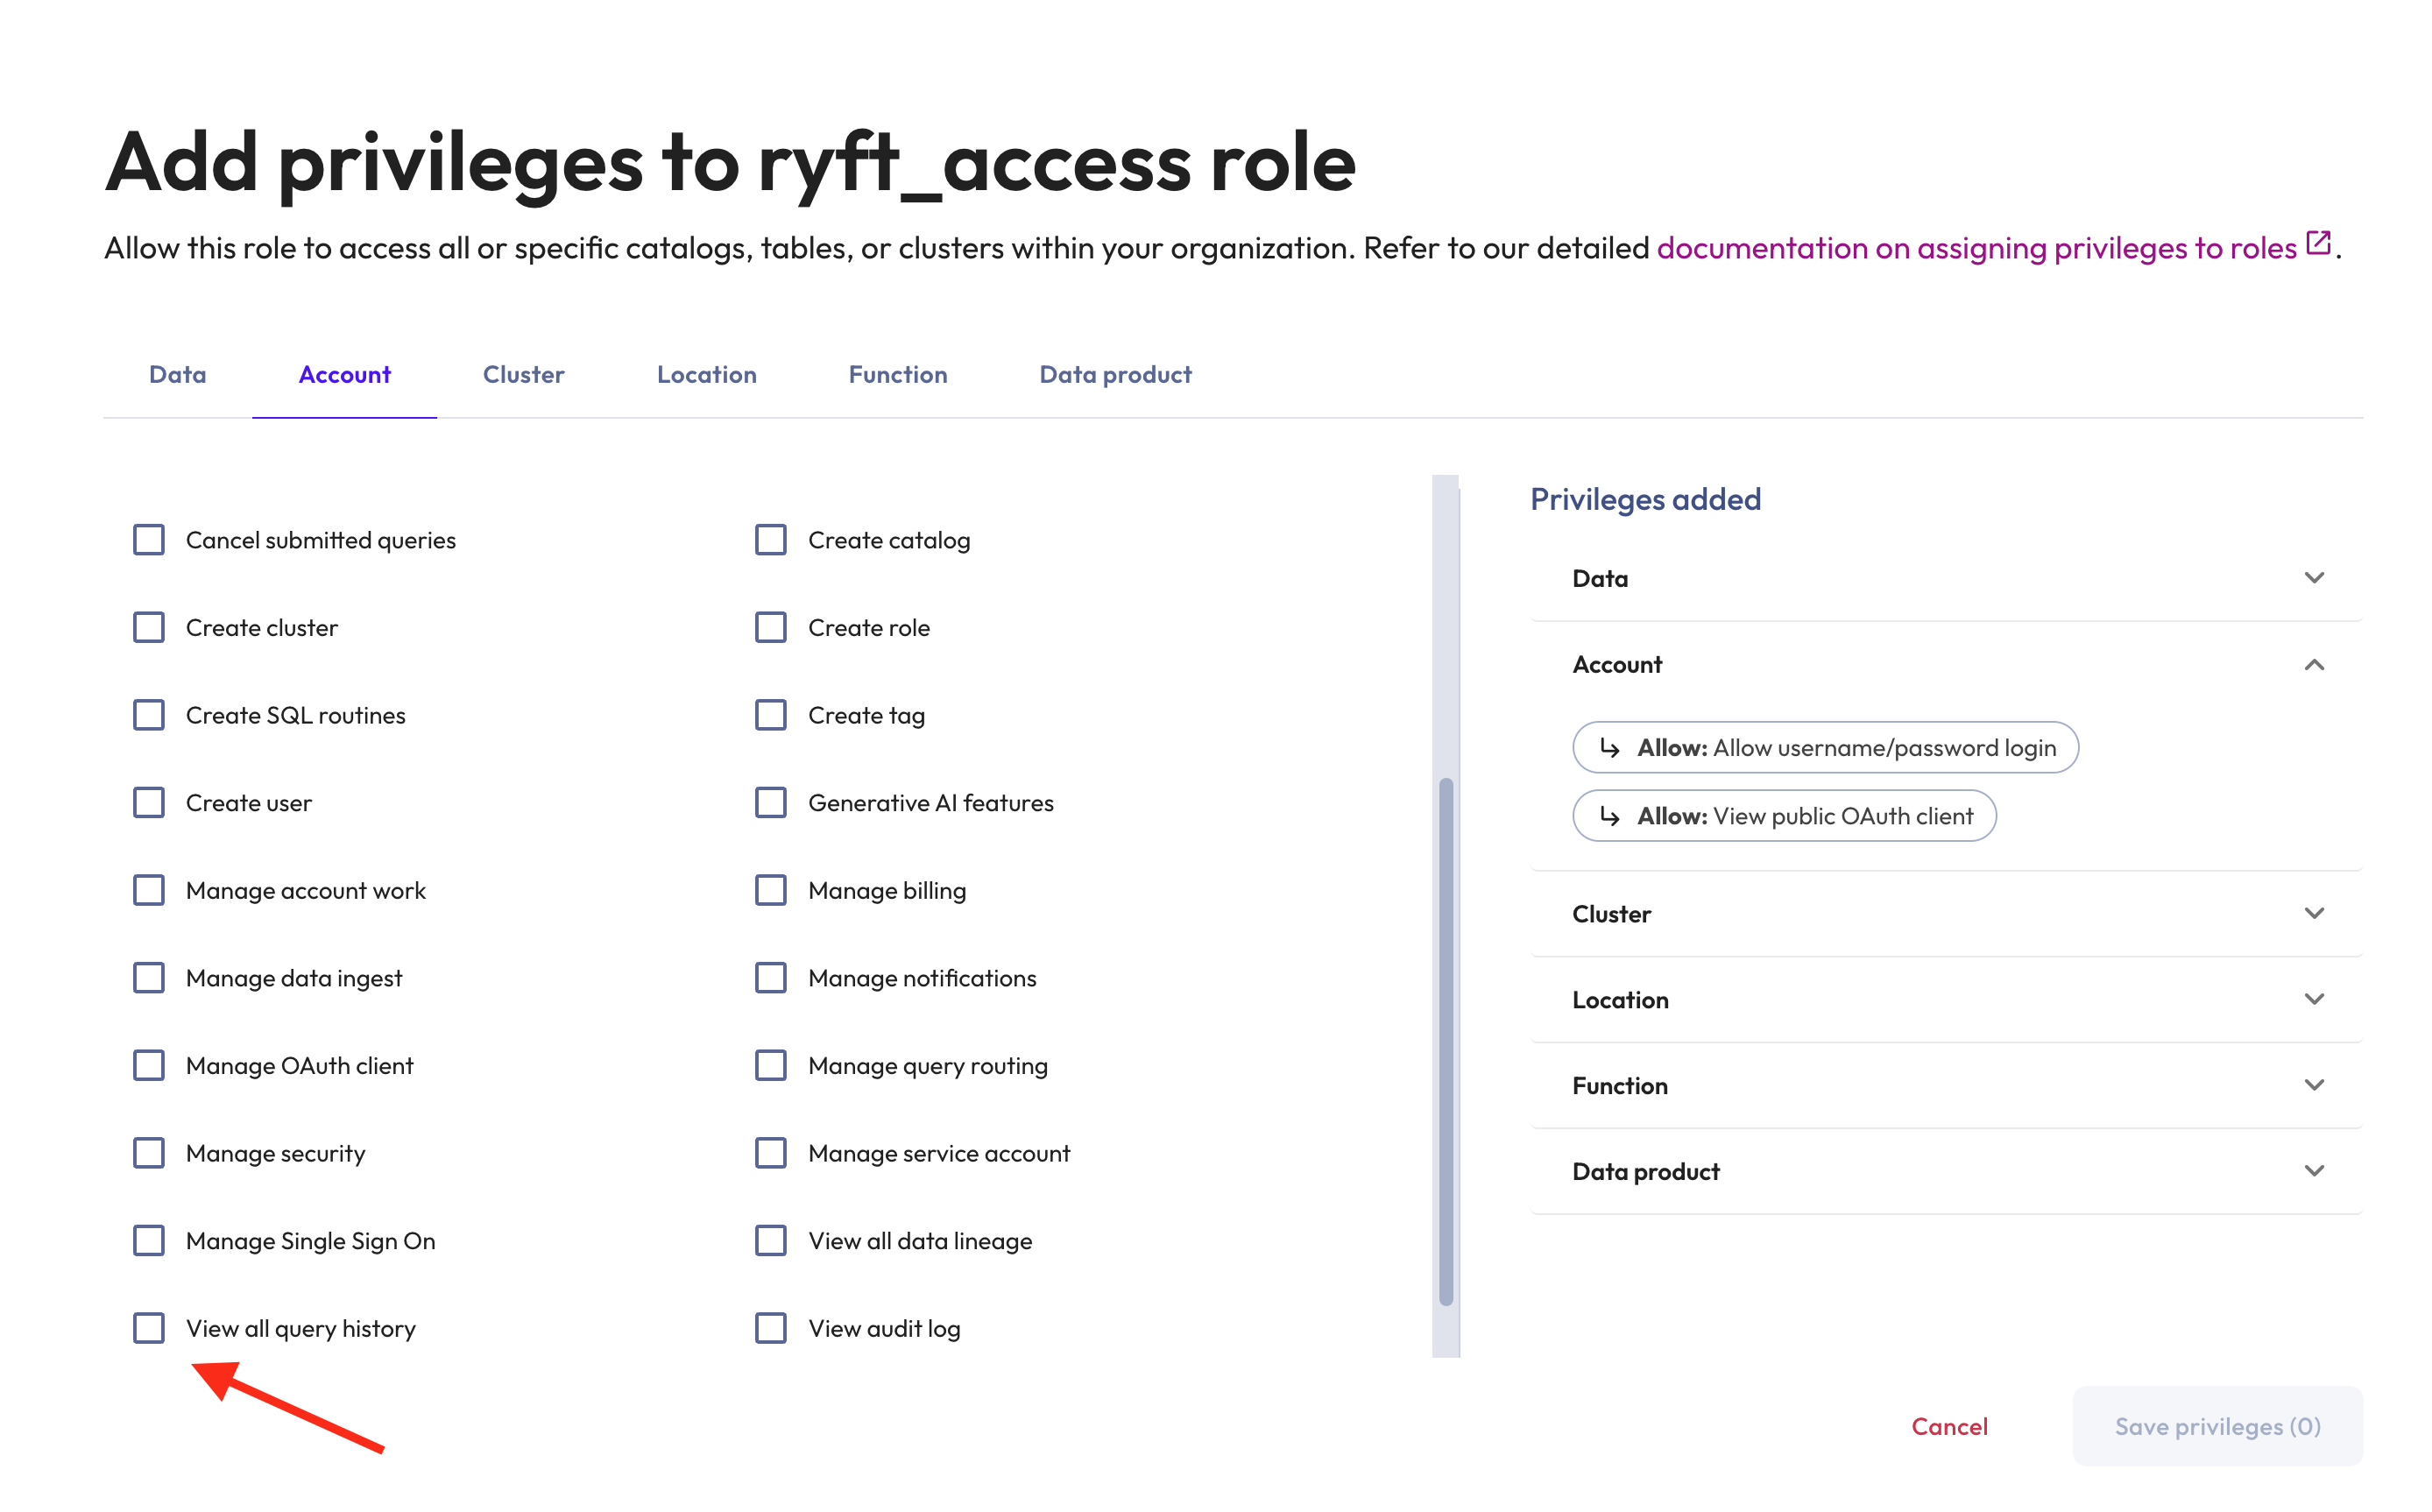 **8.** Press **Save privileges**
## Step 3: Creating the Service Account
**1.** Navigate to **Admin** > **Access** > **Service accounts**
**2.** Click **Create new service account**
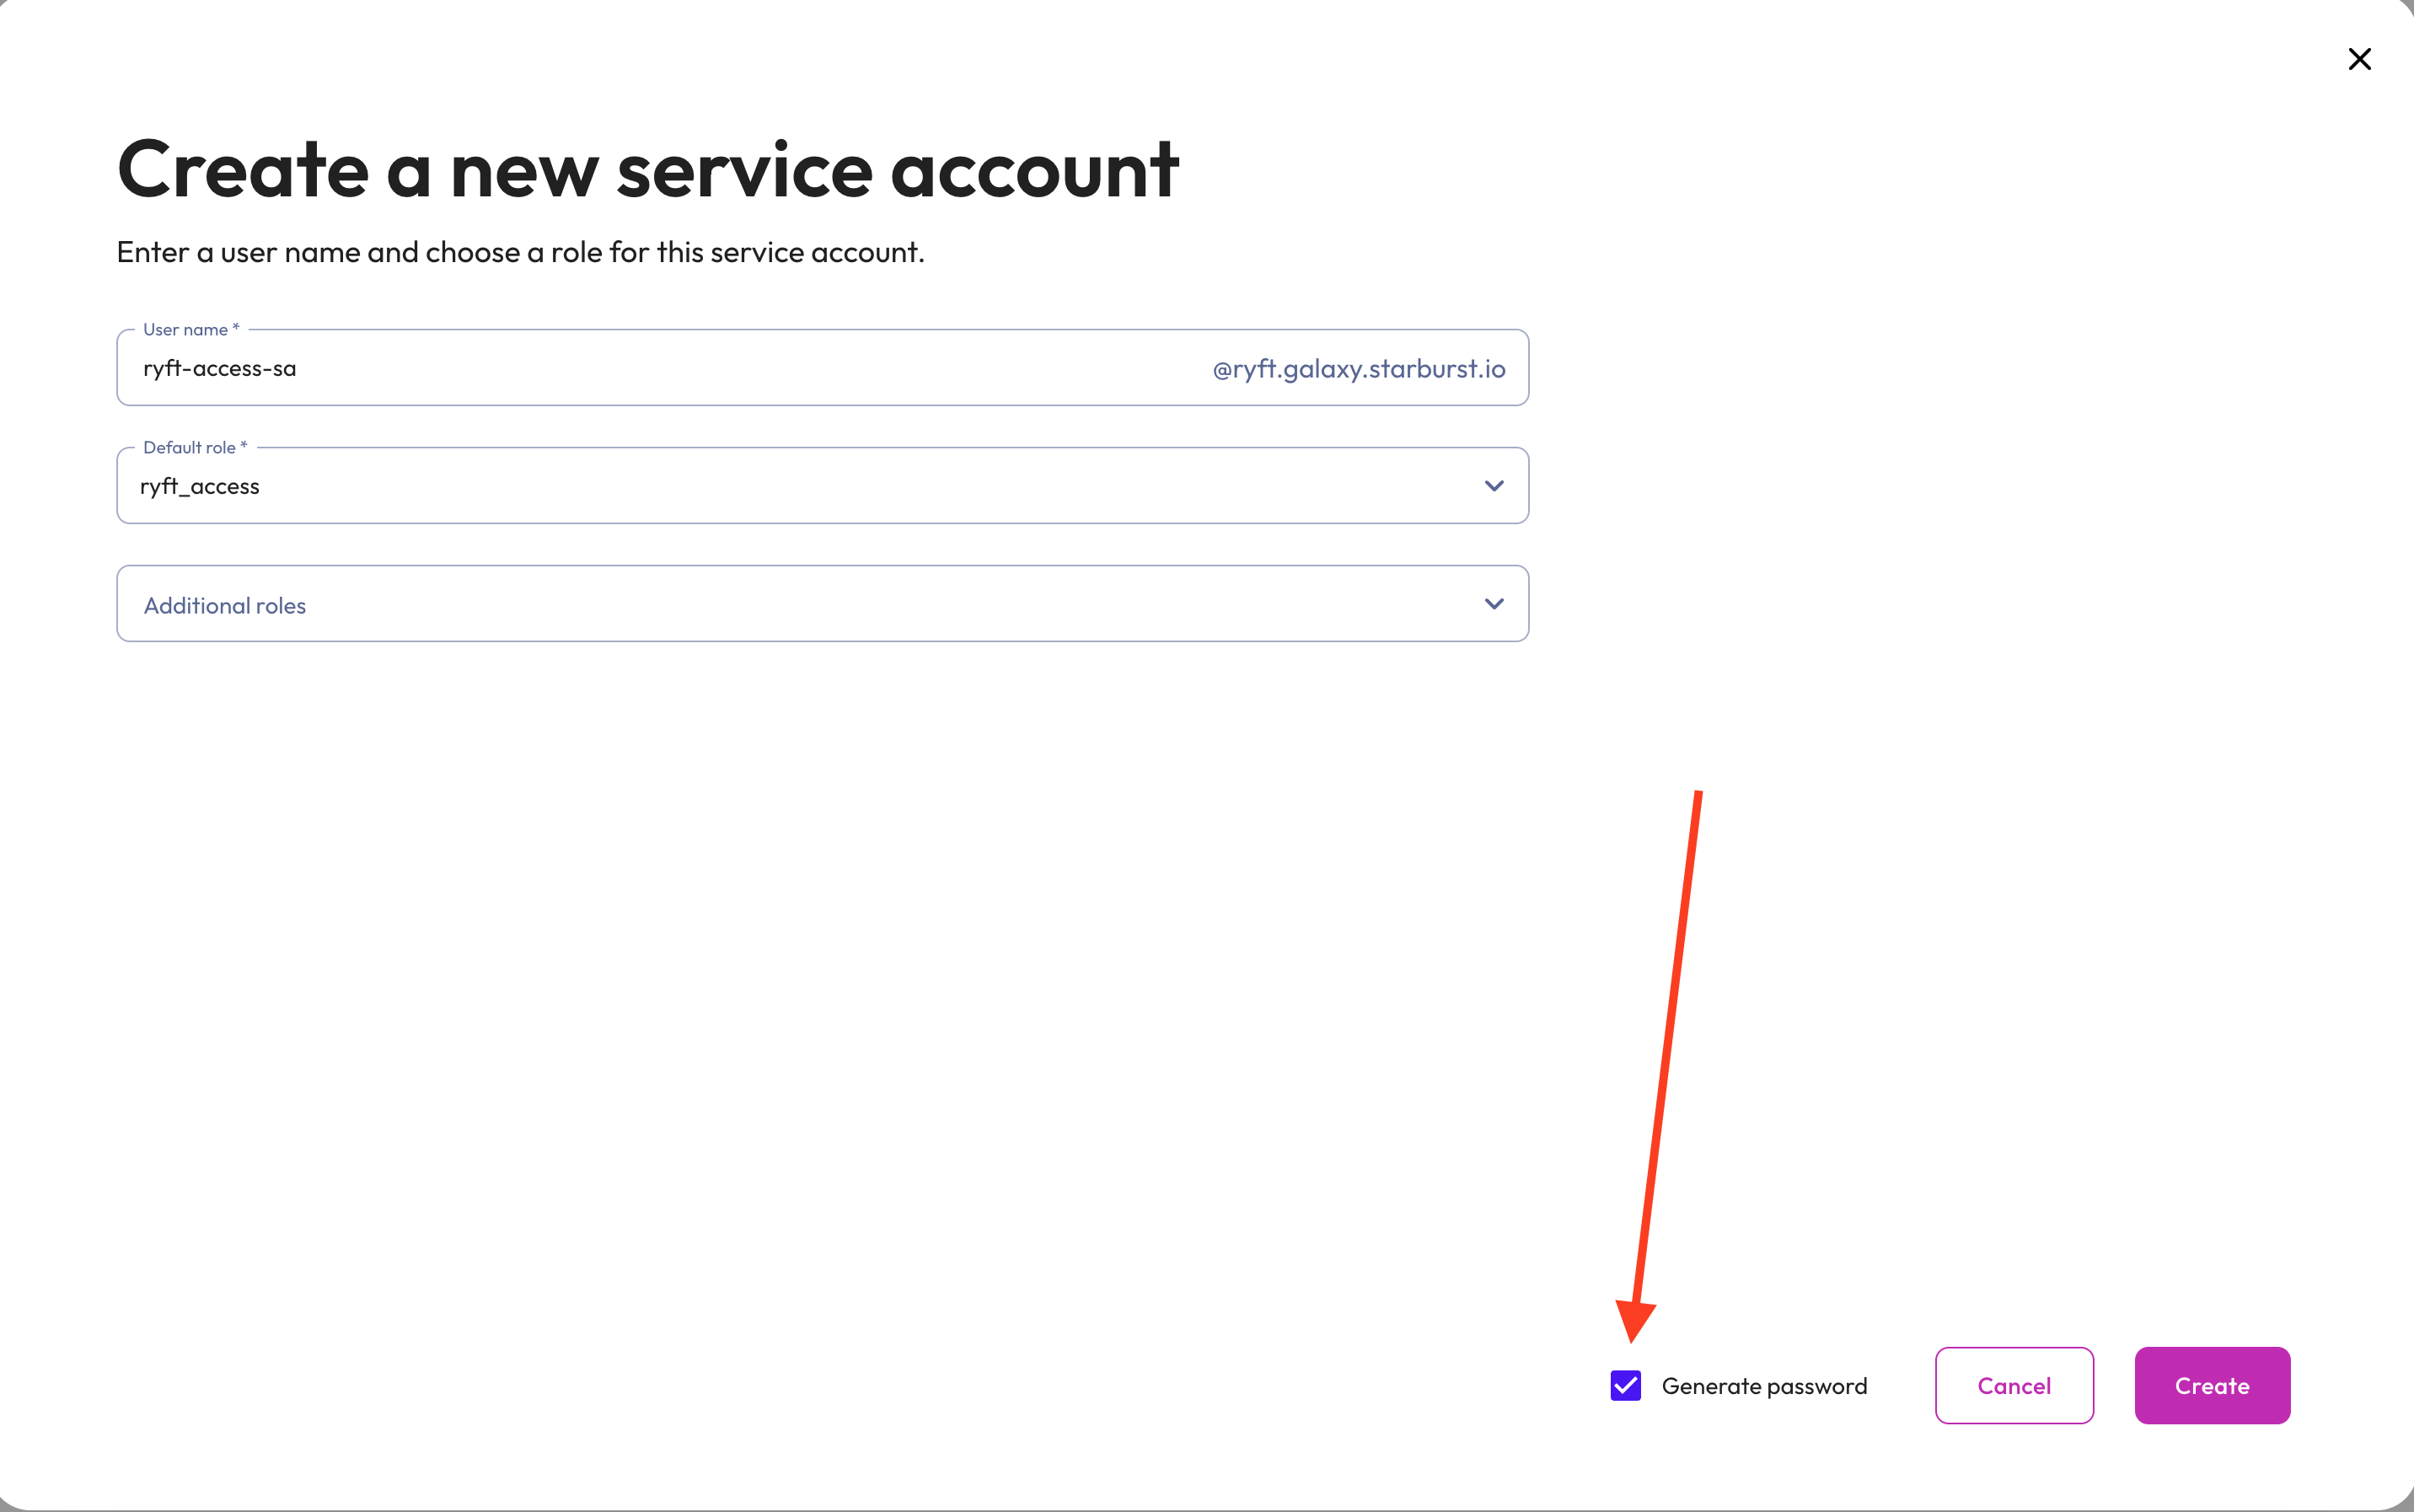
**3.** Configure the service account:
* **User name**: `ryft-access-sa`
* **Default role**: `ryft_access`
* Check **Generate password**
* Click **Create**
**8.** Press **Save privileges**
## Step 3: Creating the Service Account
**1.** Navigate to **Admin** > **Access** > **Service accounts**
**2.** Click **Create new service account**
**3.** Configure the service account:
* **User name**: `ryft-access-sa`
* **Default role**: `ryft_access`
* Check **Generate password**
* Click **Create**
 **4.** Set a password description (e.g., `ryft-sa-password`) and click **Generate password**
**Important**: Save the generated password immediately. You will not be able to view it again after this step. It needs to be shared with your Ryft representative after initial setup is complete.
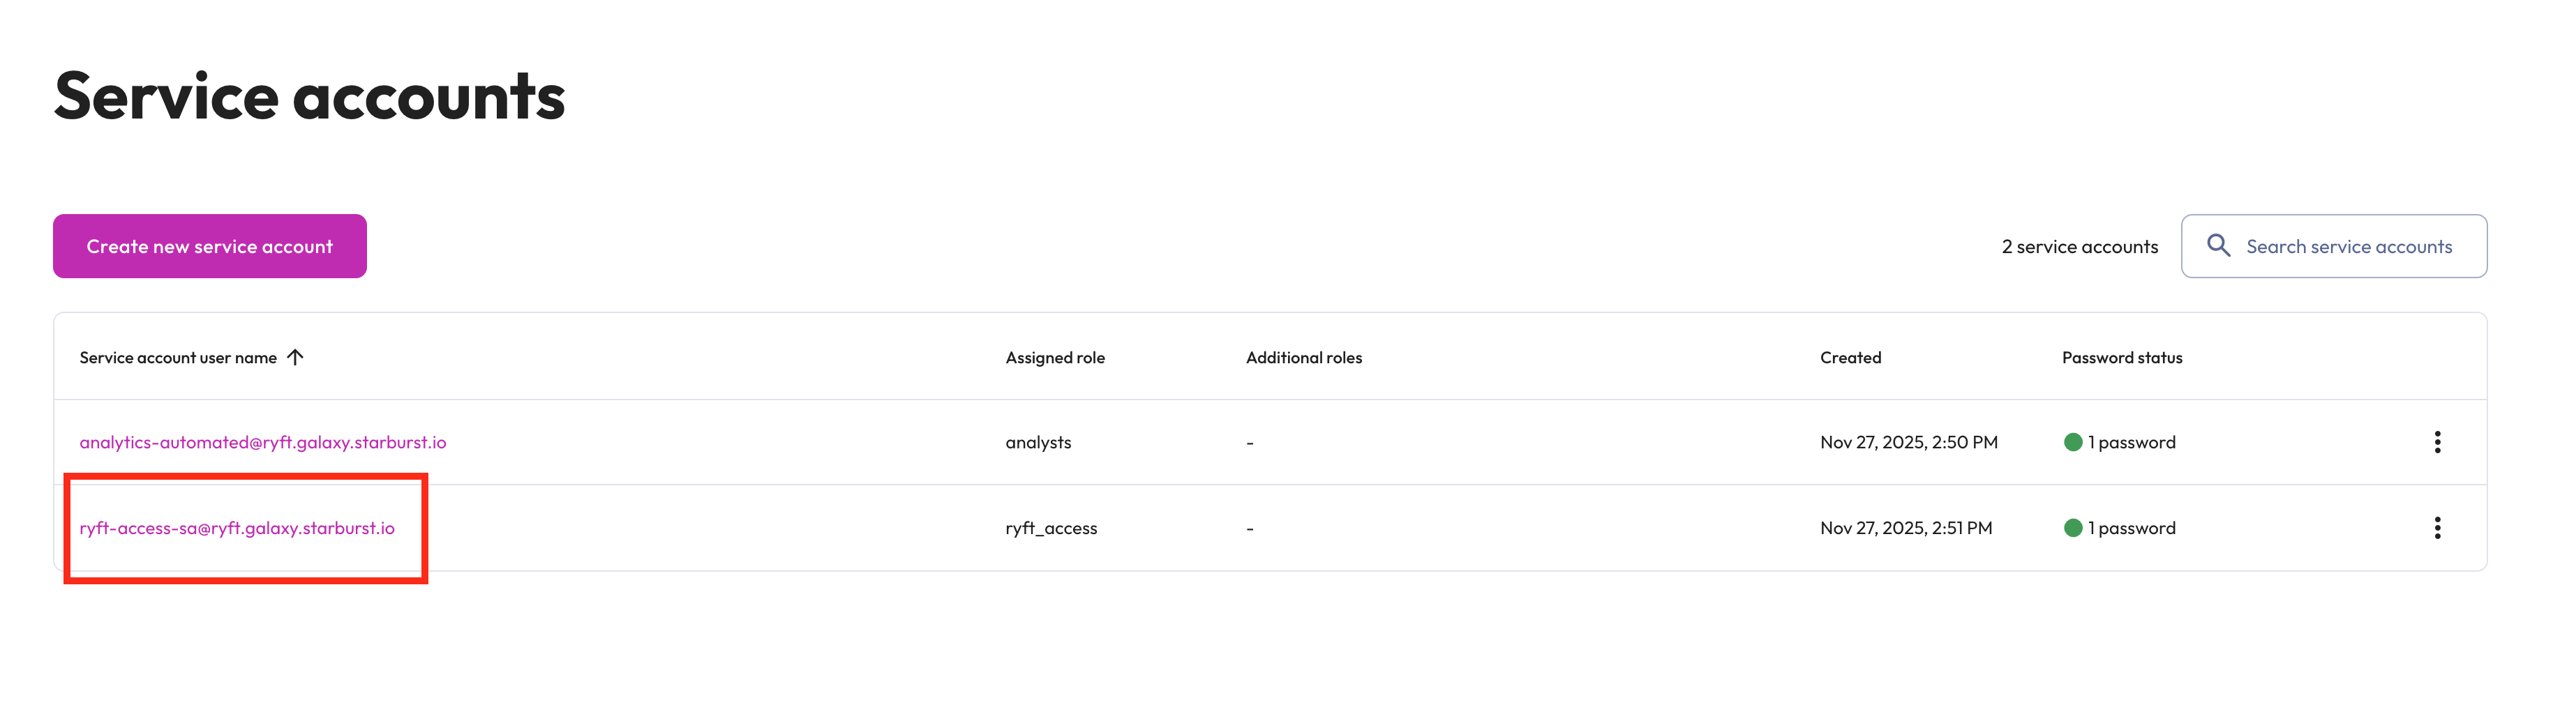
**5.** Note the **username** of the new service account, to share it with Ryft later
**4.** Set a password description (e.g., `ryft-sa-password`) and click **Generate password**
**Important**: Save the generated password immediately. You will not be able to view it again after this step. It needs to be shared with your Ryft representative after initial setup is complete.
**5.** Note the **username** of the new service account, to share it with Ryft later
 ***
## Step 4: Creating the Cluster
**1.** Navigate to **Admin** > **Clusters** in the sidebar and click **Create cluster**
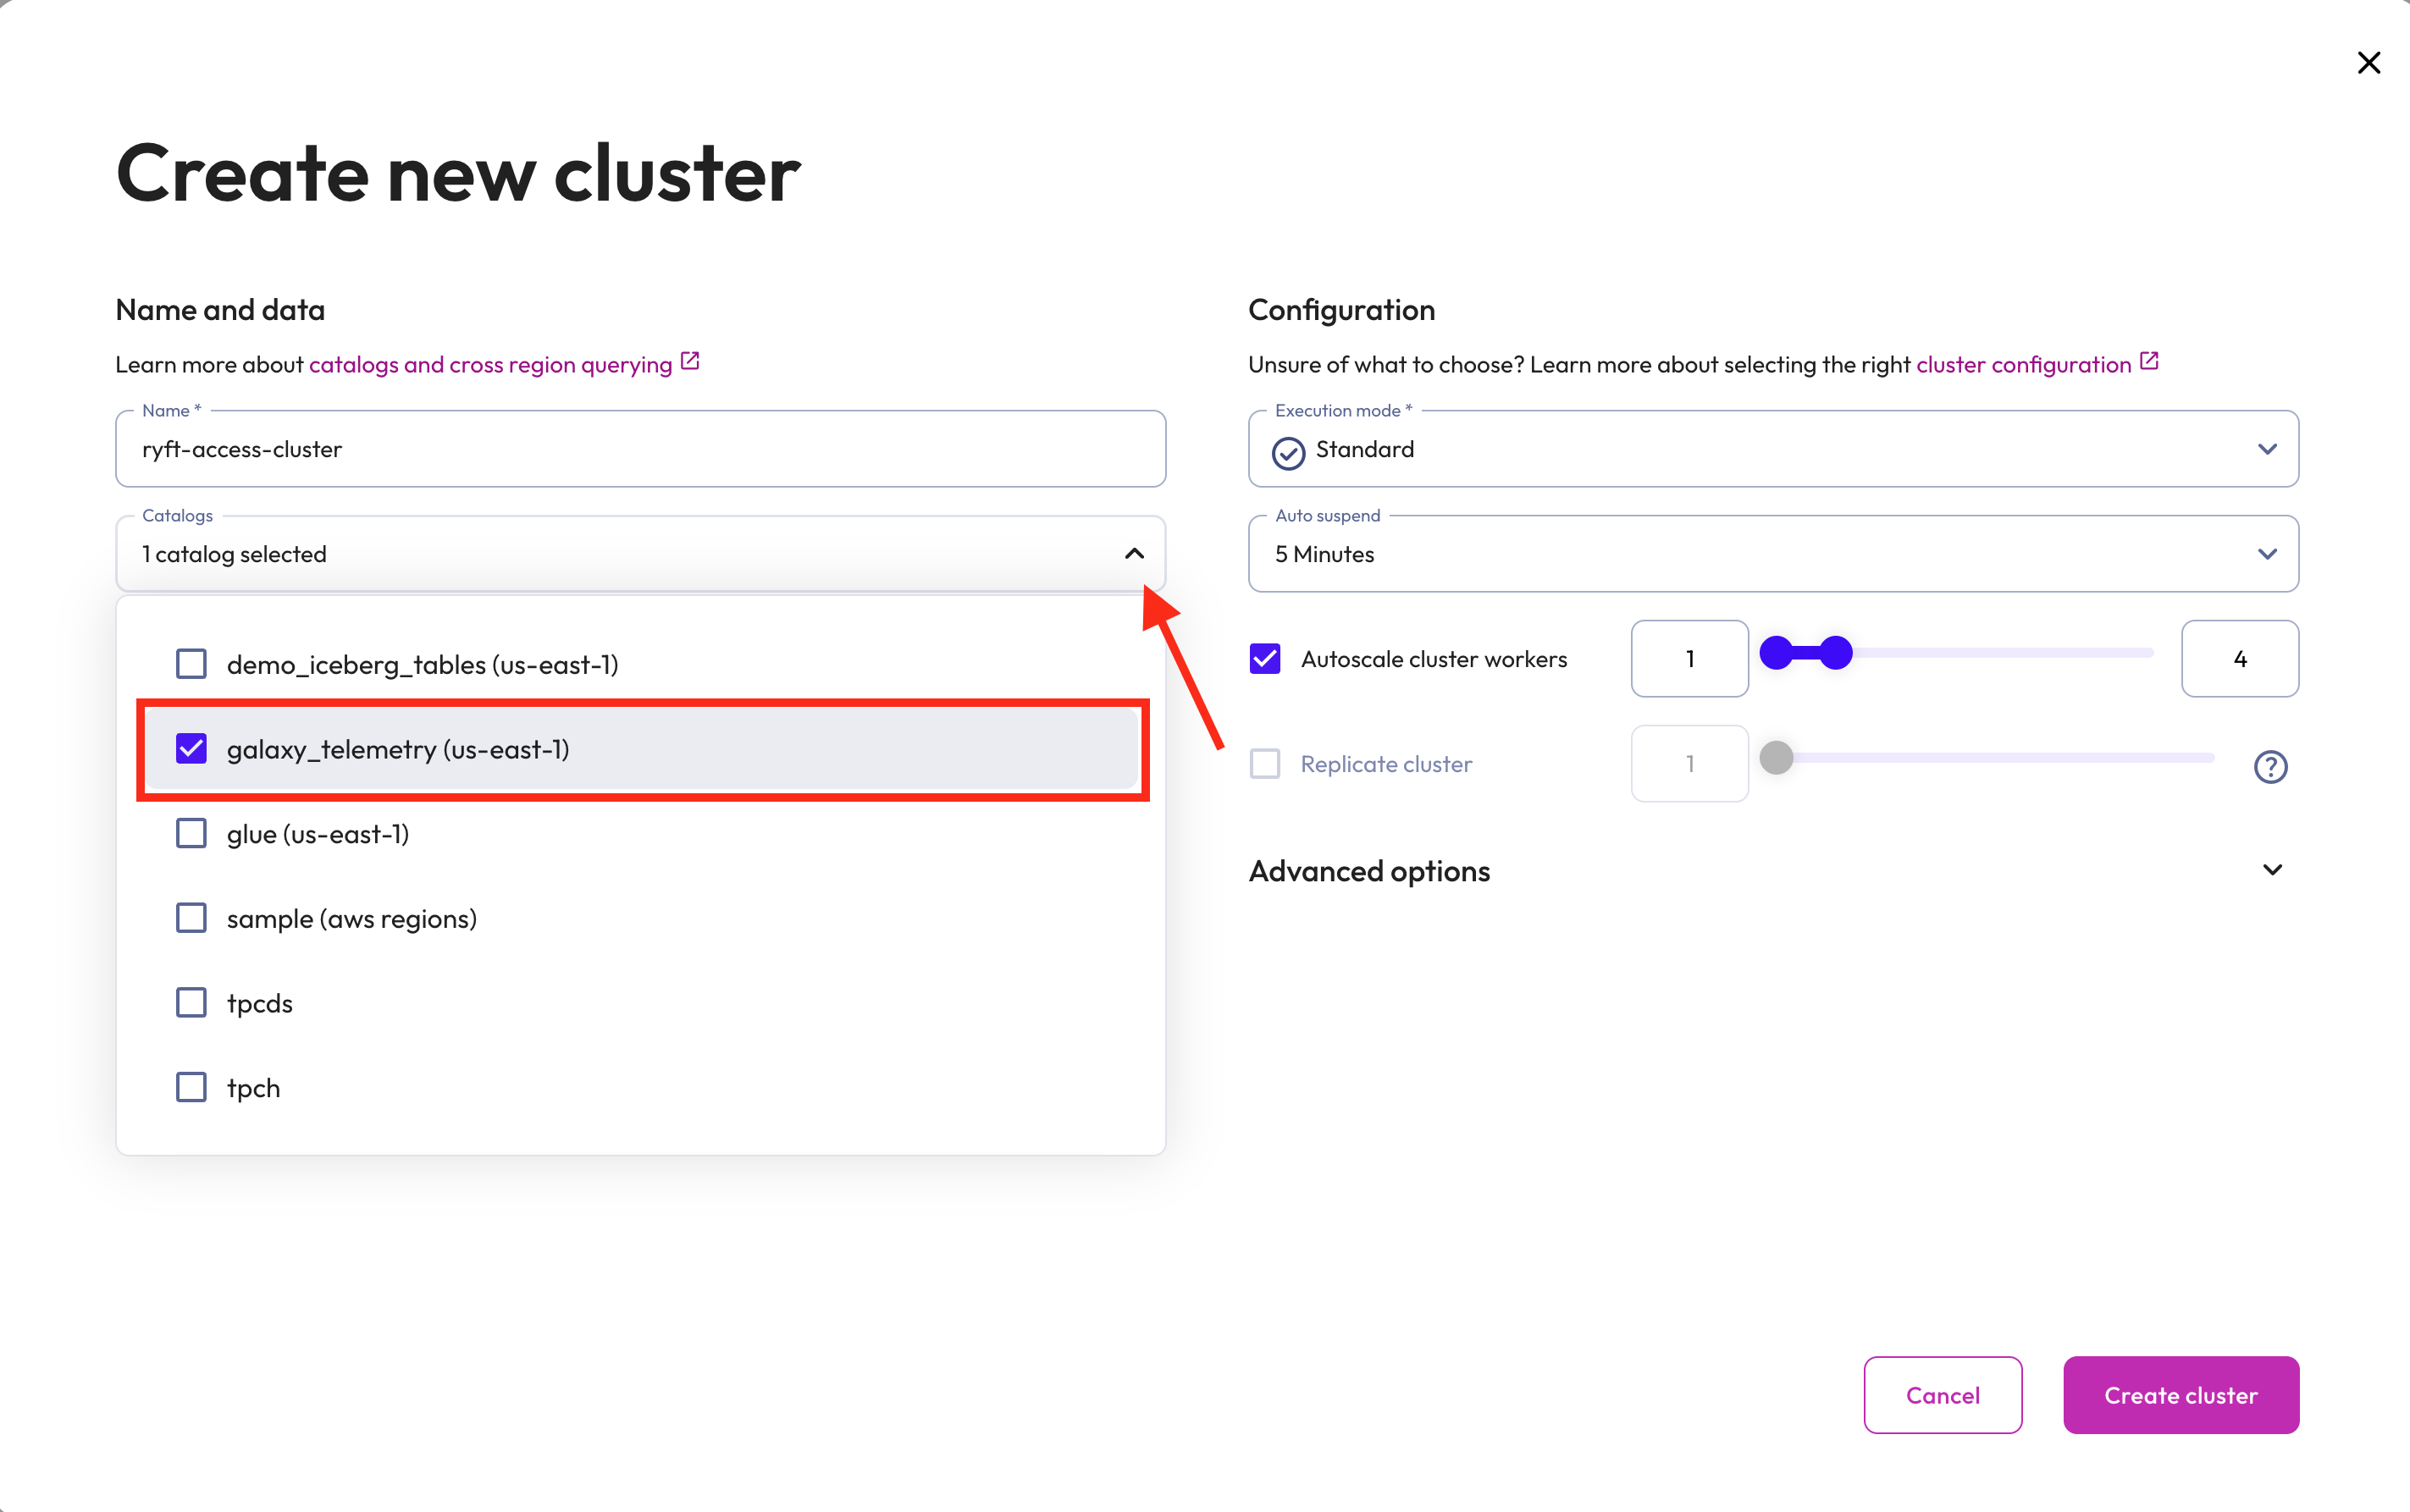
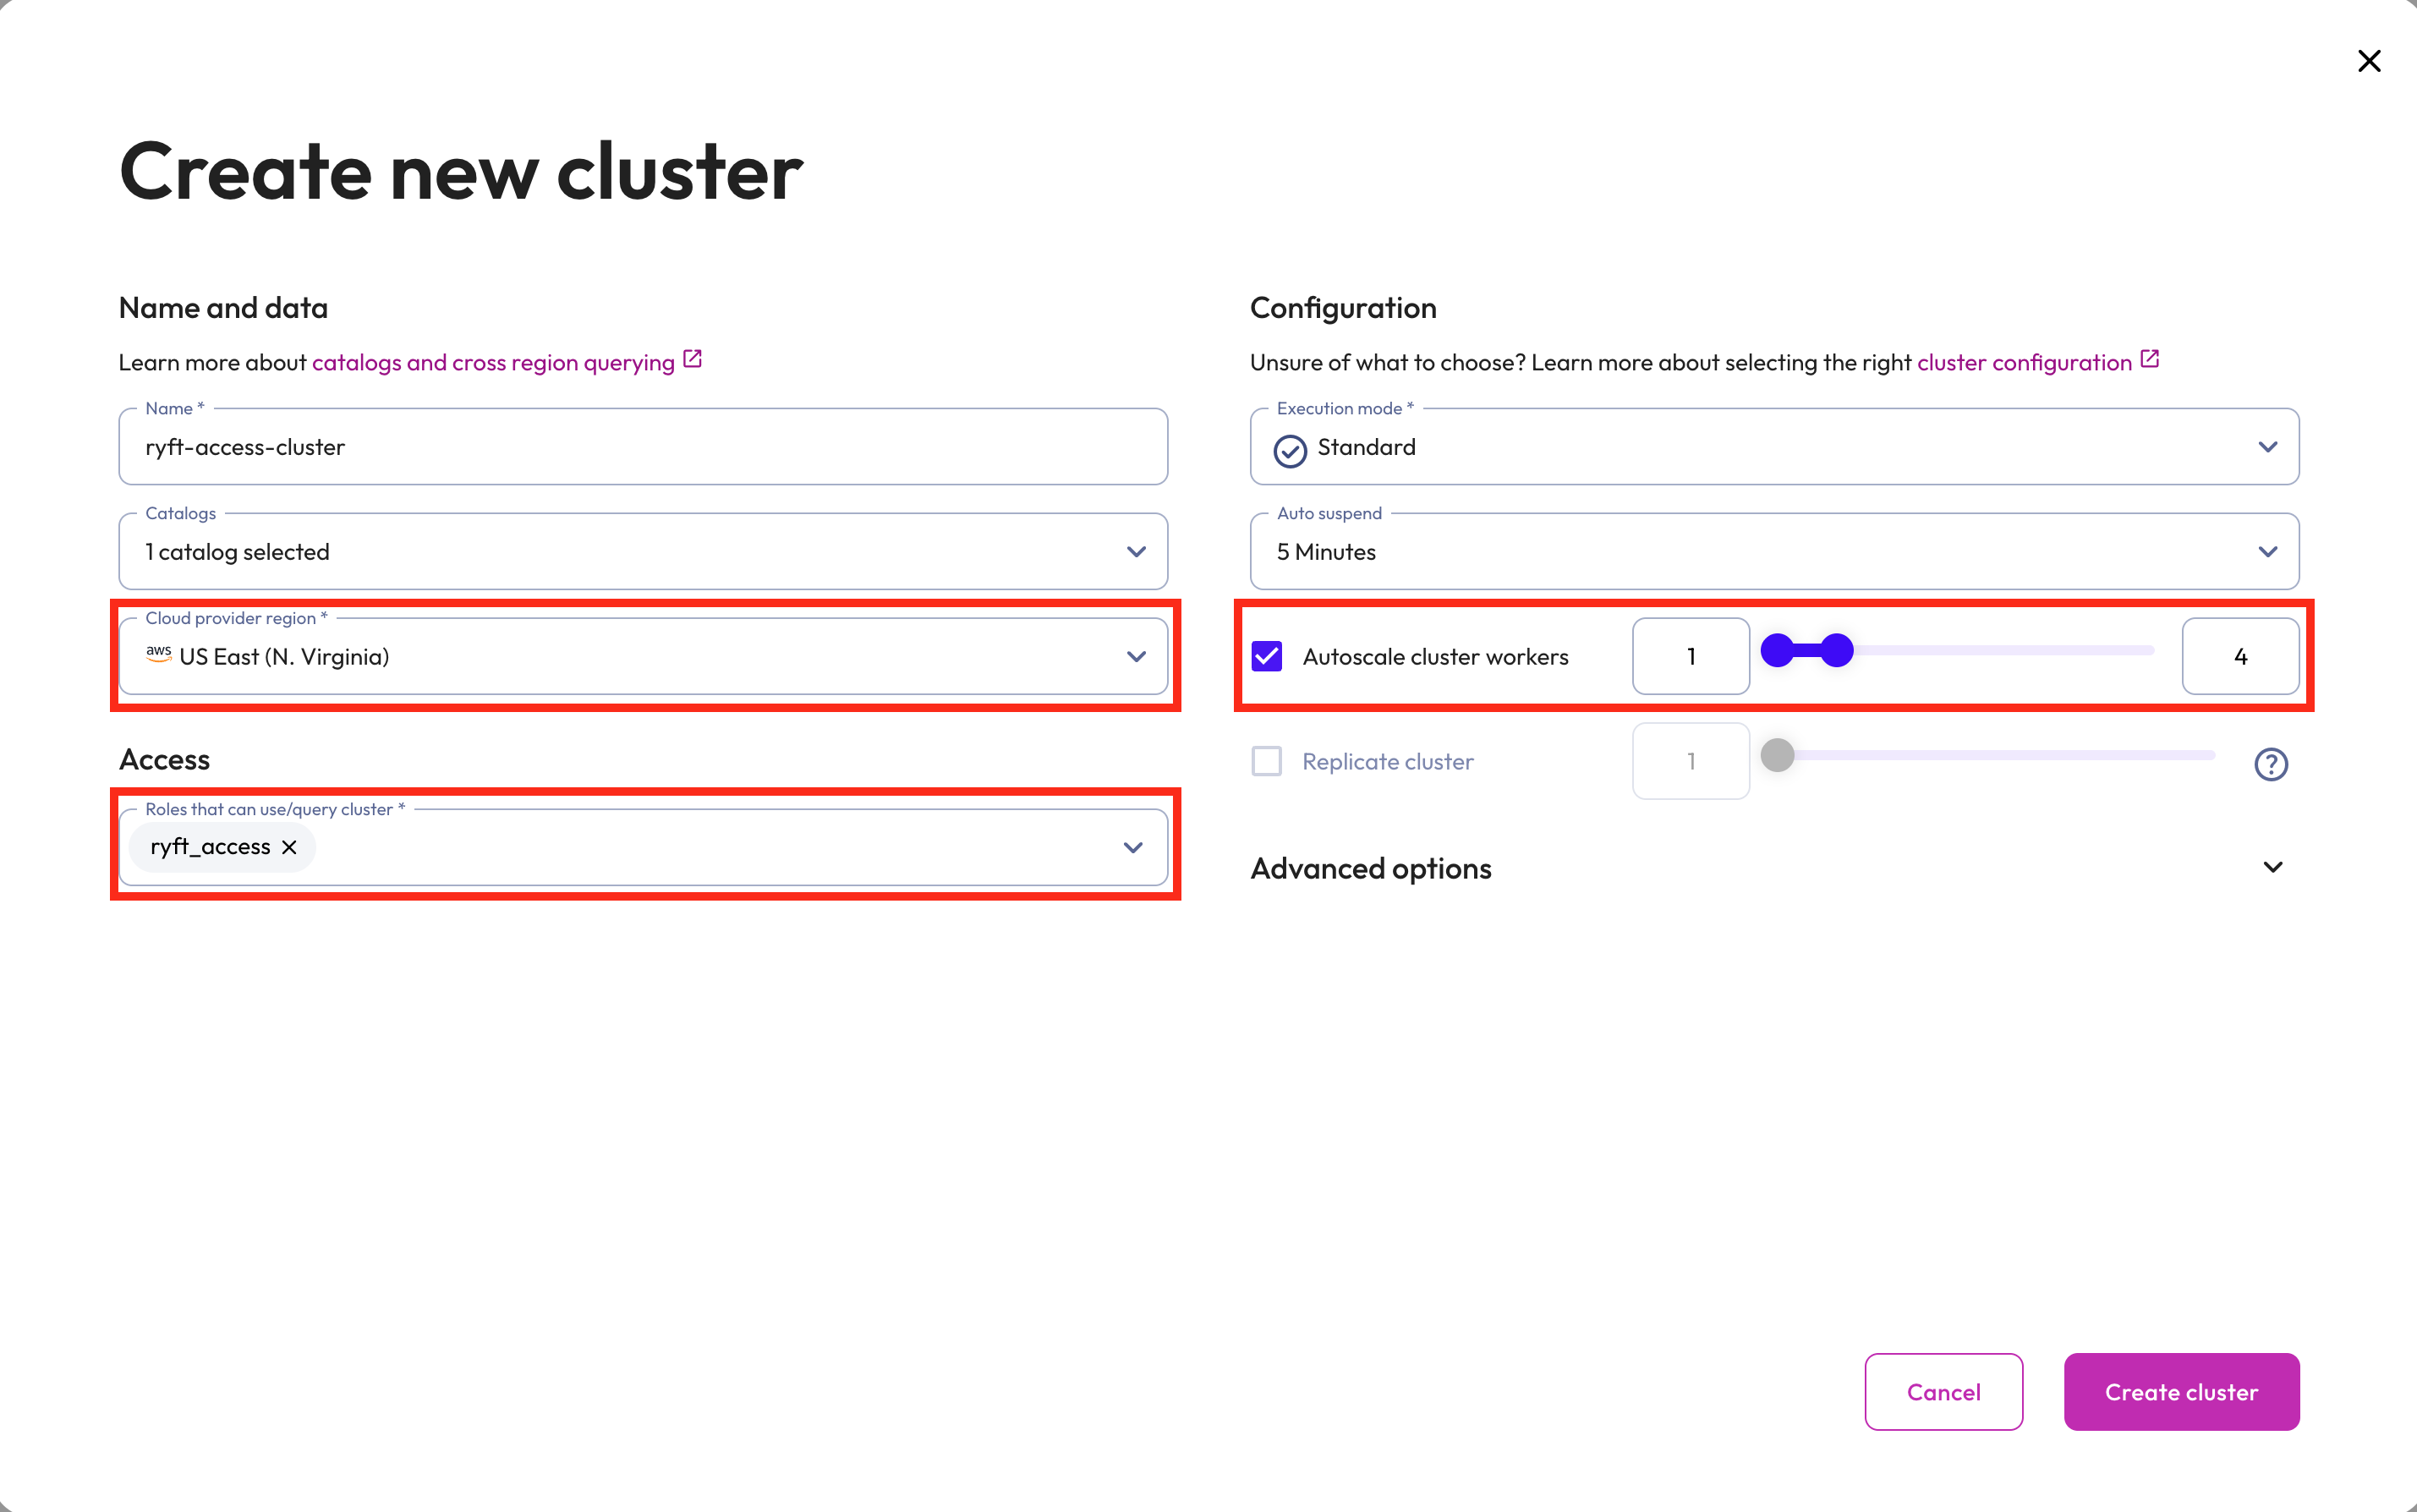
**2.** Under "Create new cluster", set up the following configuration:
* **Name**: `ryft-access-cluster`
* **Catalogs**: Select `galaxy_telemetry (us-east-1)`
* **Cloud provider region**: AWS US East (N. Virginia)
* **Access**: Select the `ryft_access` role
* **Execution mode**: Standard
* **Auto suspend**: 5 Minutes
* **Autoscale cluster workers**: Enable with range 1-4 workers
* Click **Create cluster**
`us-east-1` is the region of the `galaxy_telemetry` catalog, regardless of where your lake is stored.
***
## Step 4: Creating the Cluster
**1.** Navigate to **Admin** > **Clusters** in the sidebar and click **Create cluster**
**2.** Under "Create new cluster", set up the following configuration:
* **Name**: `ryft-access-cluster`
* **Catalogs**: Select `galaxy_telemetry (us-east-1)`
* **Cloud provider region**: AWS US East (N. Virginia)
* **Access**: Select the `ryft_access` role
* **Execution mode**: Standard
* **Auto suspend**: 5 Minutes
* **Autoscale cluster workers**: Enable with range 1-4 workers
* Click **Create cluster**
`us-east-1` is the region of the `galaxy_telemetry` catalog, regardless of where your lake is stored.
 ***
## Step 5: Getting Connection Information
Once your cluster is configured, you will need to share its connection details with Ryft.
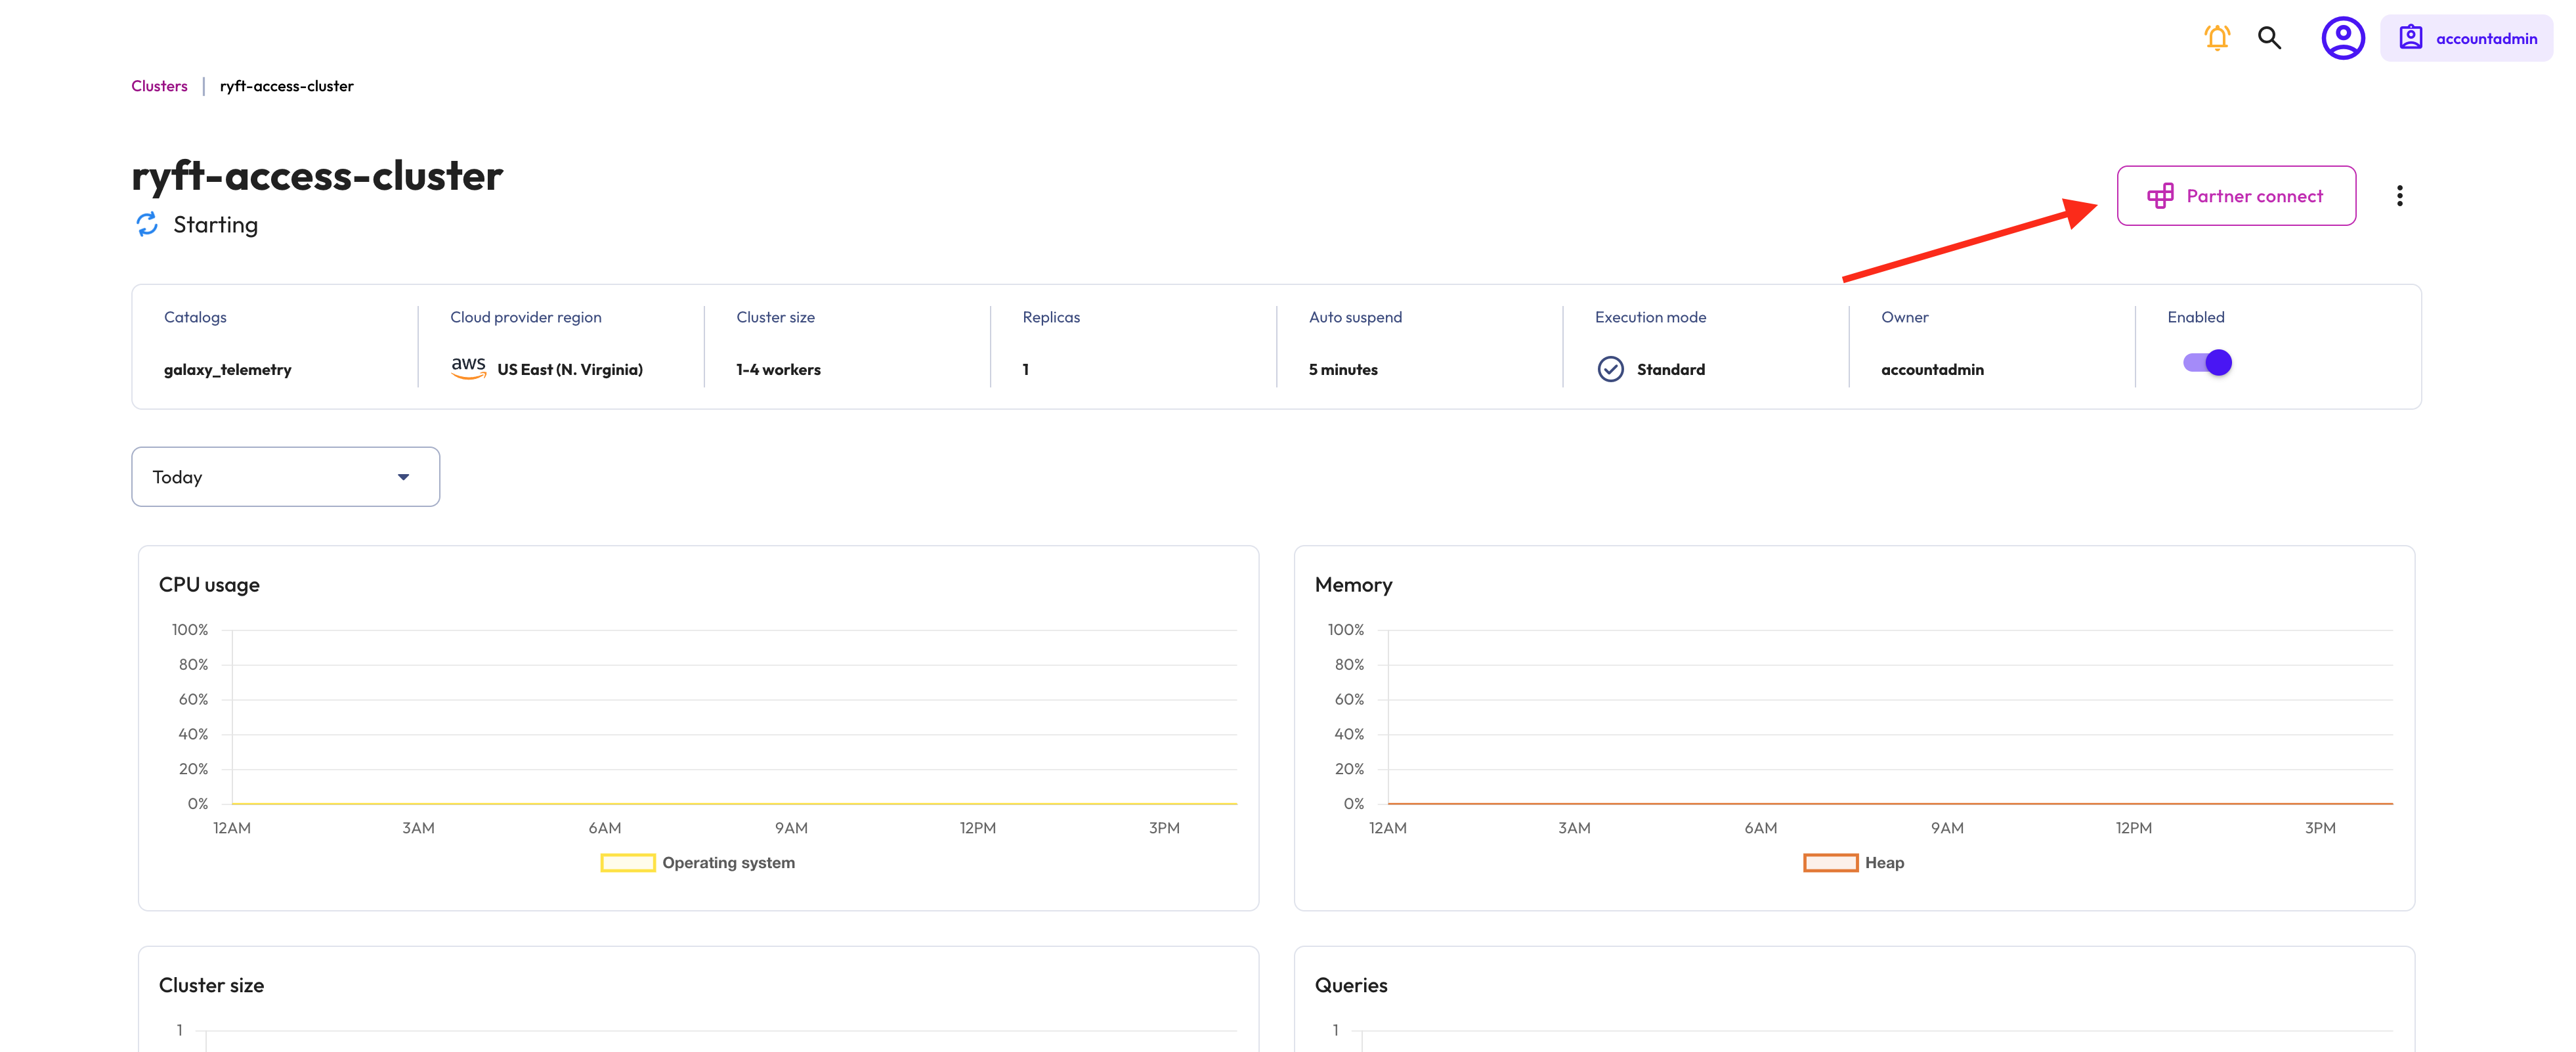
**1.** Click on the new cluster’s name and then "Partner Connect"
***
## Step 5: Getting Connection Information
Once your cluster is configured, you will need to share its connection details with Ryft.
**1.** Click on the new cluster’s name and then "Partner Connect"
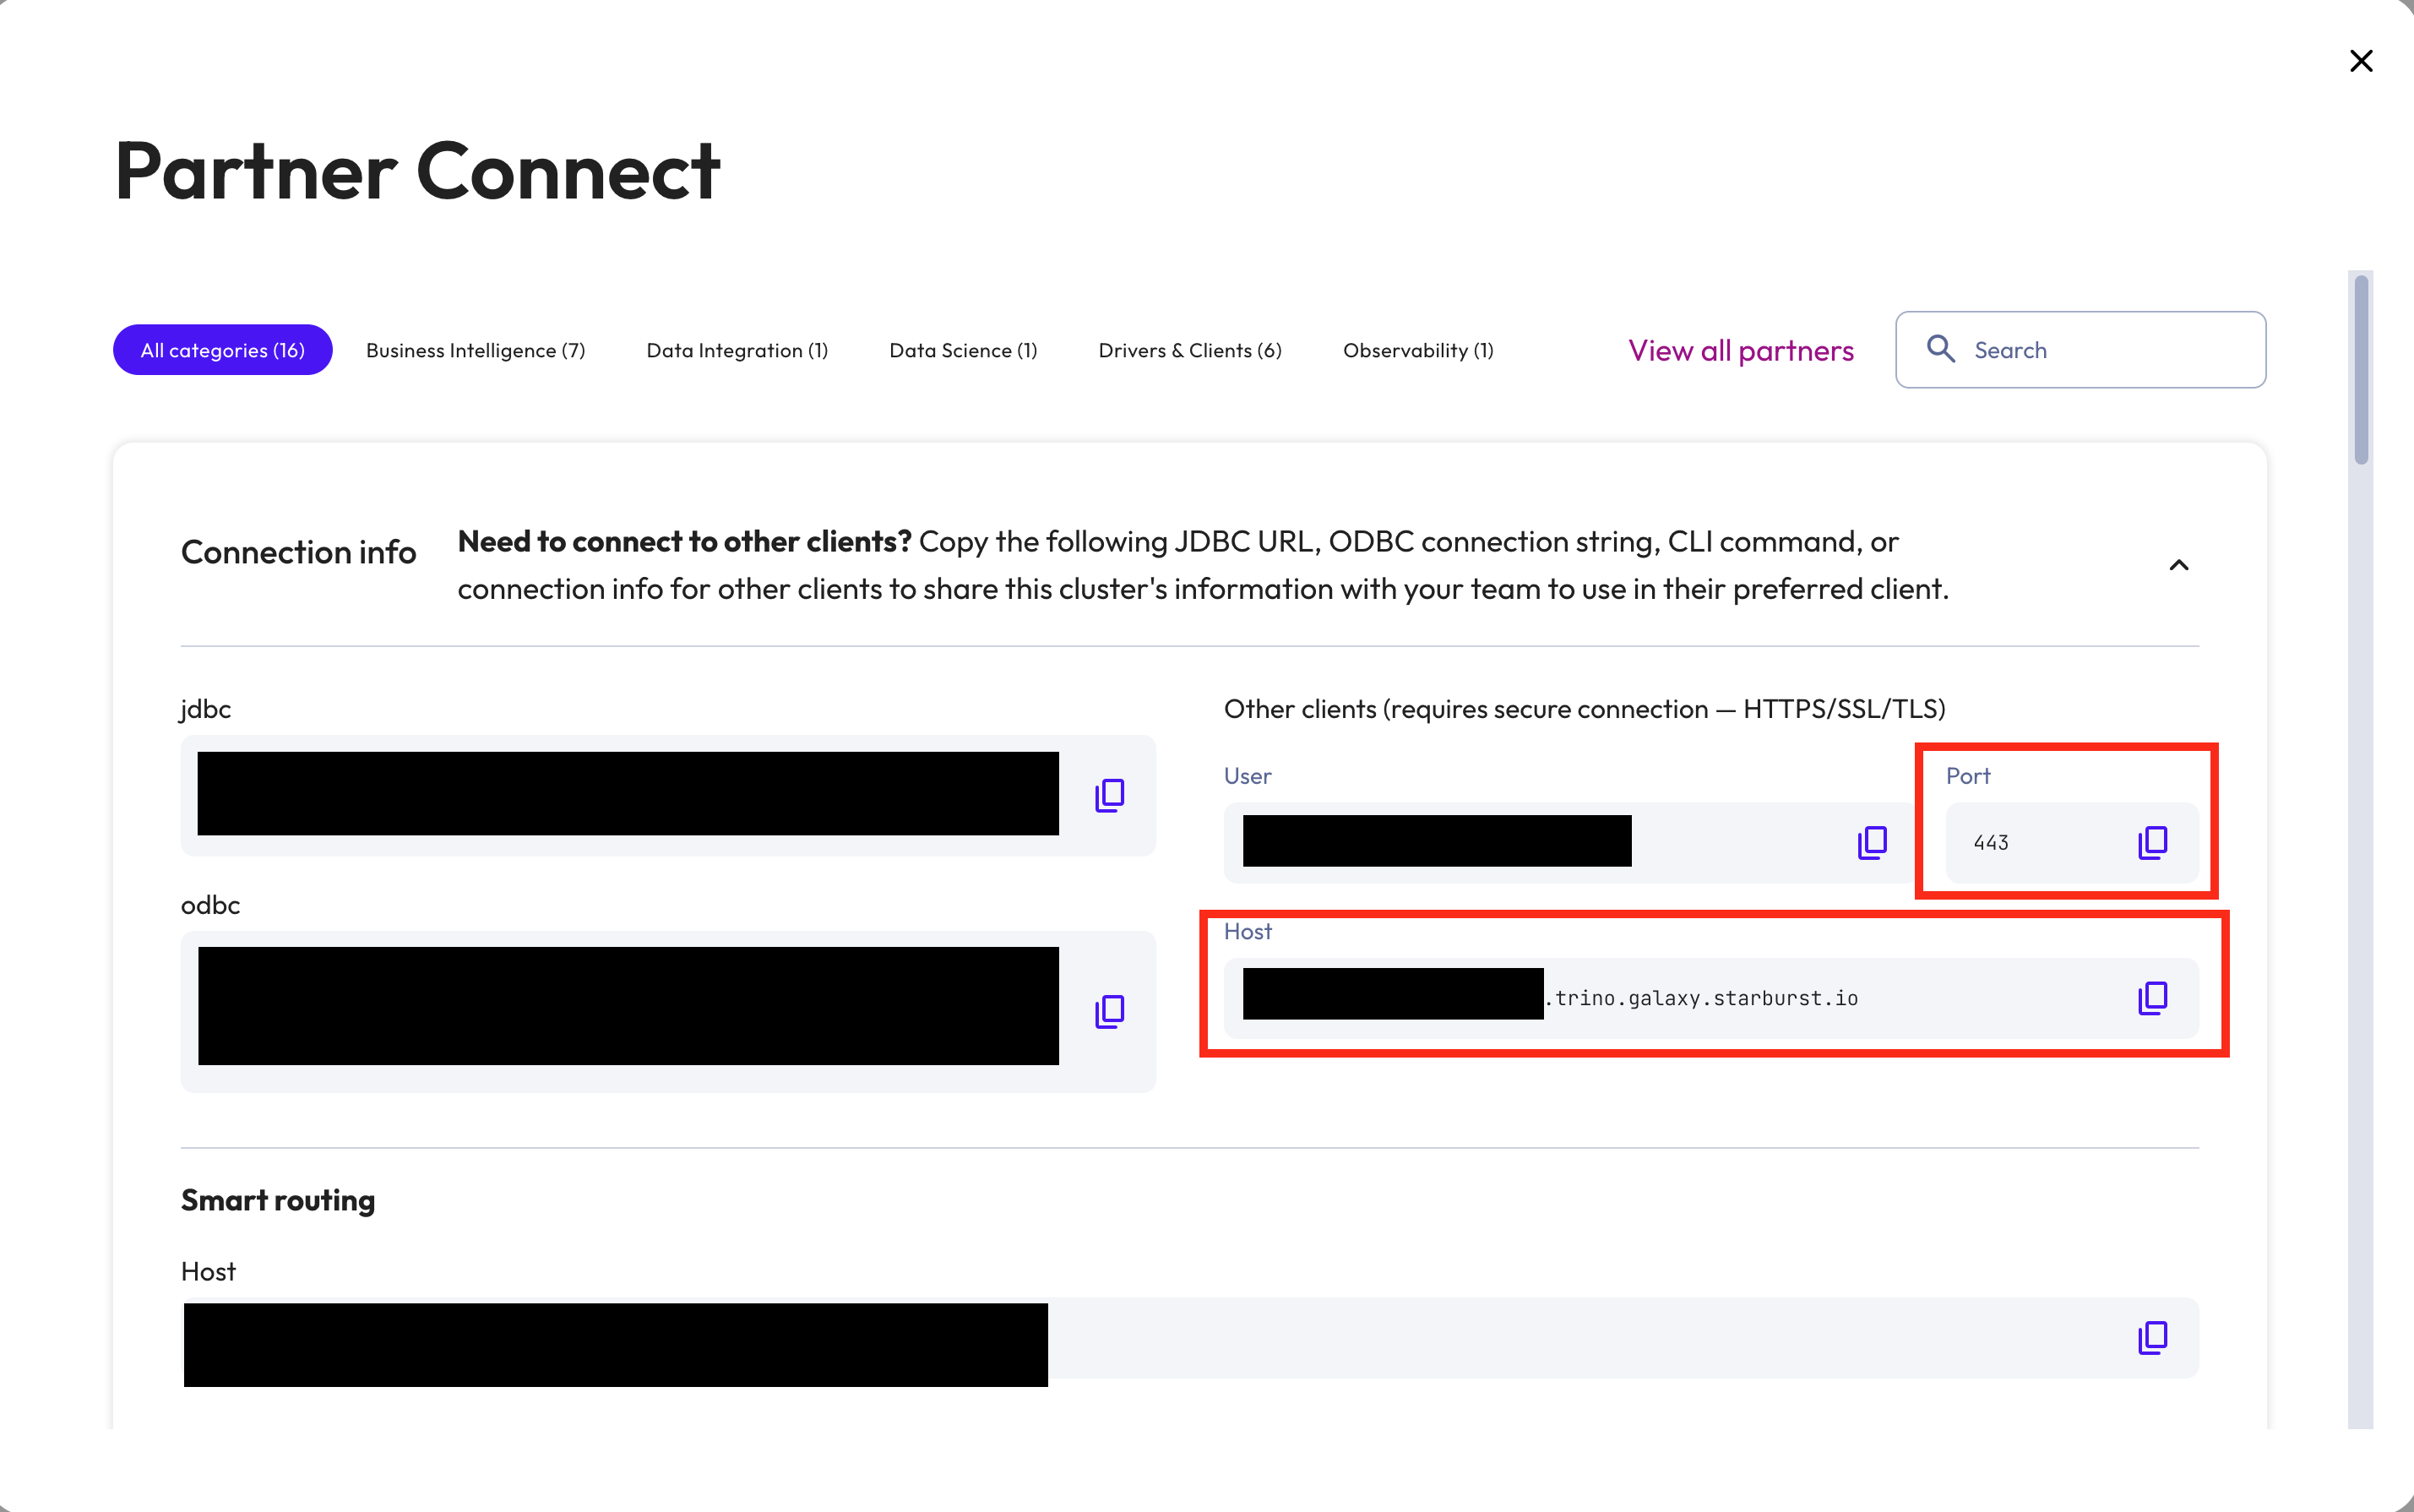
 **2.** Click on “Connection info” and then copy the connection information from the `Port` and `Host` blocks.
 ***
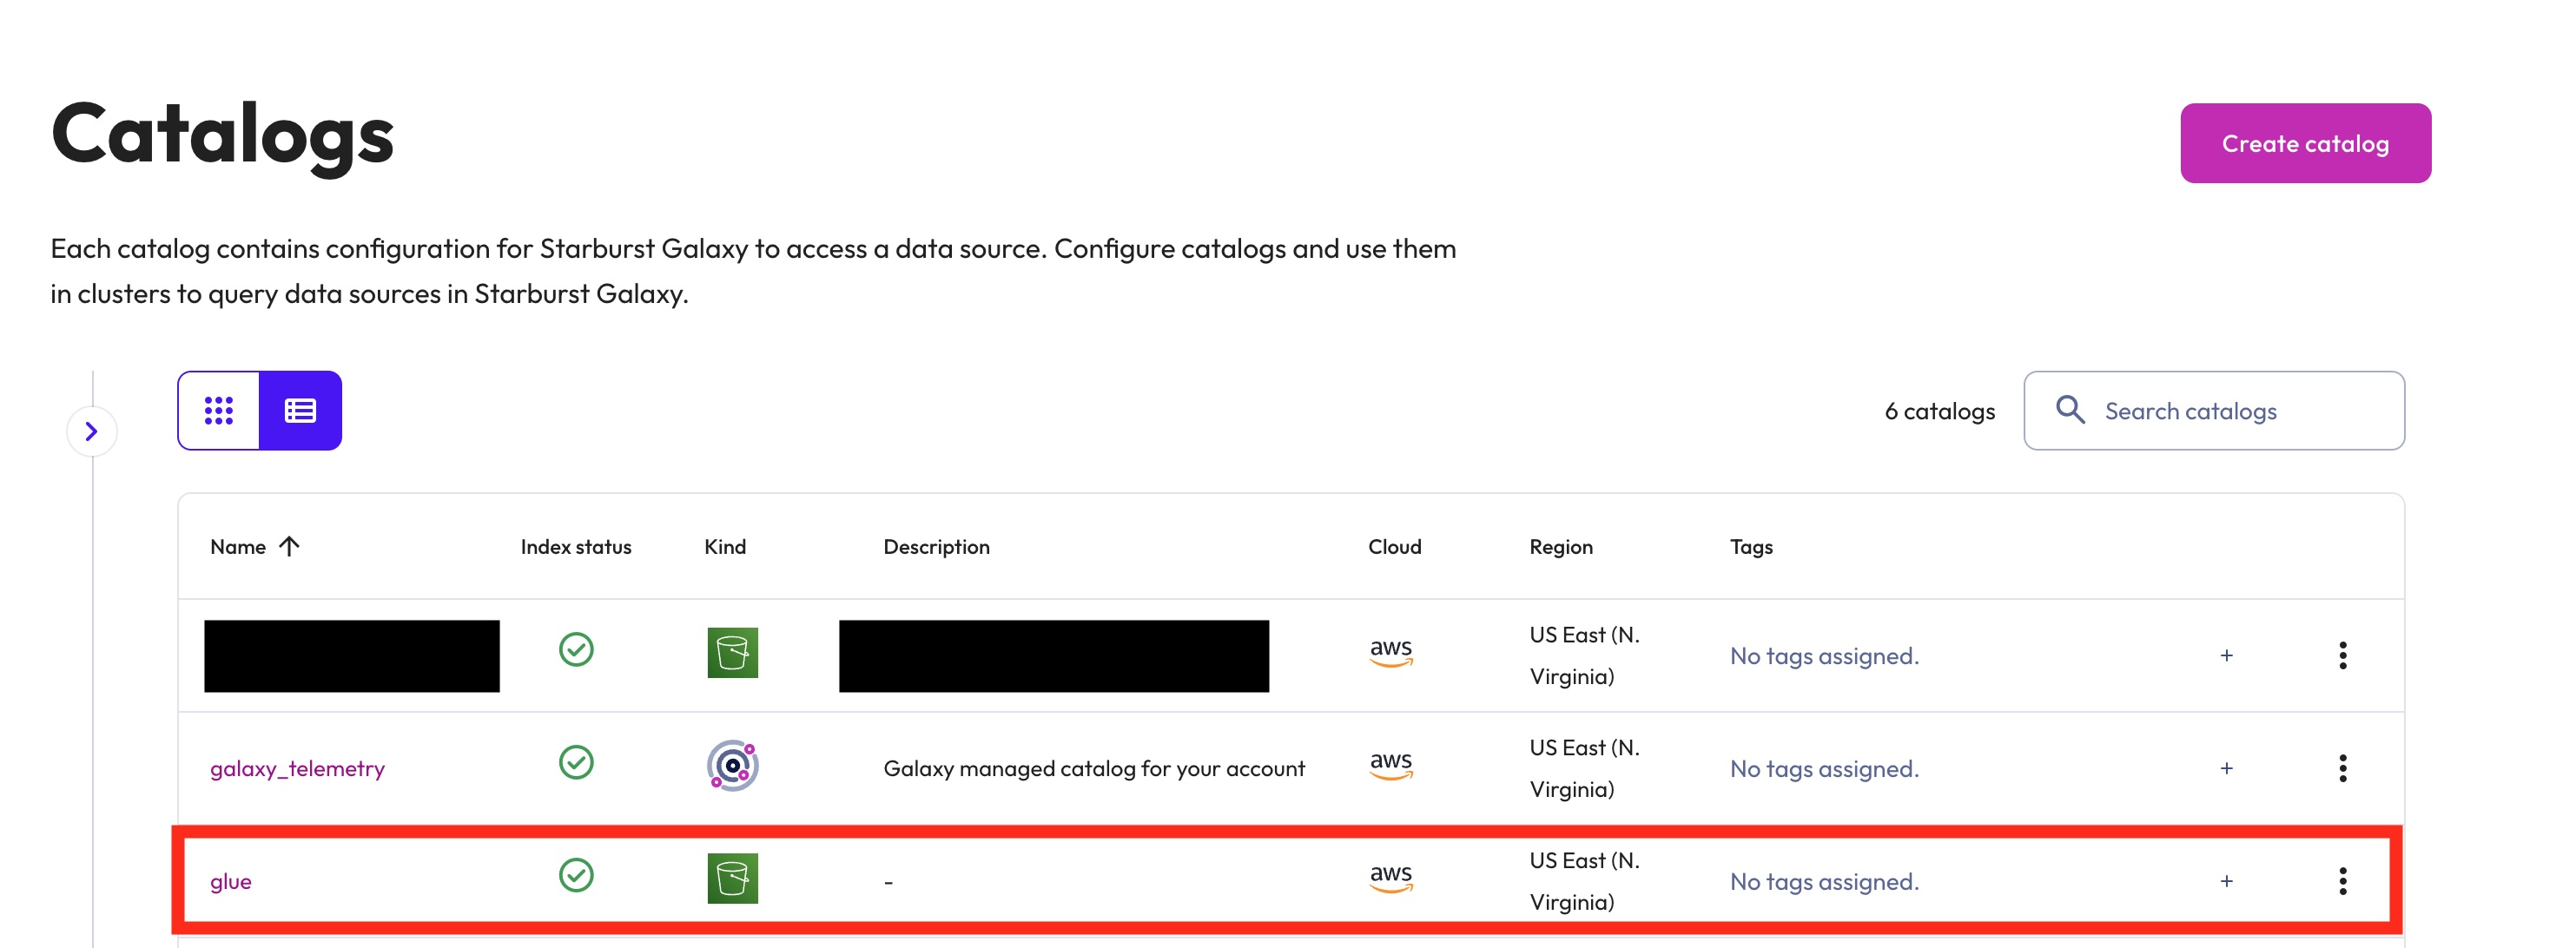
## Step 6: Extract the Catalog name that is used to access external Iceberg tables
Click on "Catalogs" tab (Under "Data" section), and locate the catalog that is connected to your Iceberg external catalog.
Provide the catalog name (from the "name" column) to Ryft.
***
## Step 6: Extract the Catalog name that is used to access external Iceberg tables
Click on "Catalogs" tab (Under "Data" section), and locate the catalog that is connected to your Iceberg external catalog.
Provide the catalog name (from the "name" column) to Ryft.
 **Setup Complete!**
In order to finalize the integration with Starburst Galaxy, share the following information with Ryft:
* Ryft’s service account **username** and **password** from step **3**
* Ryft’s cluster **host** and **port** from step **5**
* Starburst **catalog name** for the catalog that is used to access external Iceberg tables from step **6**
**Setup Complete!**
In order to finalize the integration with Starburst Galaxy, share the following information with Ryft:
* Ryft’s service account **username** and **password** from step **3**
* Ryft’s cluster **host** and **port** from step **5**
* Starburst **catalog name** for the catalog that is used to access external Iceberg tables from step **6**